Tabs

home aboutme homedecor recycle sew organize gallery
Showing posts with label Recycle. Show all posts

Monday, May 4, 2020

Kids Craft: DIY Bird House

DIY Bird House, Kids Crafts, Summer activities for kids, Kids DIY, Kids DIY Bird House

We live in Florida and the weather here has been beautiful for past 2 months. My daughter and I spend most of our quarantine in our patio. Our mornings are filled with sweet birdie tweets and melodies. Last week I decided to make a bird house and we up-cycled our empty milk mug into this cute little bird house. 

DIY Bird House, Kids Crafts, Summer activities for kids, Kids DIY, Kids DIY Bird House

You need scissors, an empty milk jug and some duct tape to make this bird house. We used some acrylic colors and stencils that we had on hand to decorate it but this step is totally optional.


DIY Bird House, Kids Crafts, Summer activities for kids, Kids DIY, Kids DIY Bird House

I used my duct tape to trace 2 circles on the milk mug and cut them out with scissors. Use your judgement if you are going to let your little one handle the scissors.

DIY Bird House, Kids Crafts, Summer activities for kids, Kids DIY, Kids DIY Bird House

Then we both covered the cut circles with pieces of duct tape as shown in the picture, just to protect the birds from any sharp edges.

DIY Bird House, Kids Crafts, Summer activities for kids, Kids DIY, Kids DIY Bird House

Decorating our bird house was so much fun. My little one loved having the freedom to pick colors of her choice and sponging the paints all by herself. She was super excited to remove the stencil and see how beautiful the flowers turned out.

DIY Bird House, Kids Crafts, Summer activities for kids, Kids DIY, Kids DIY Bird House

After the acrylic colors dried out I took out my clear spray can that I had left over from years ago and sprayed it lightly on our design to protect it from rain. I closed the bird holes with the cut out circles and tape as shown in the picture as not to get any spray inside the bird house.

DIY Bird House, Kids Crafts, Summer activities for kids, Kids DIY, Kids DIY Bird House

We used couple of bamboo skewers from our kitchen and made little platform for birds entrance as shown in the picture above. After getting the skewers in right position I cut off the sharp pointed ends a little so that it will be completely safe for the birds. You can instead use the popsicle sticks if you have.

DIY Bird House, Kids Crafts, Summer activities for kids, Kids DIY, Kids DIY Bird House

I used an Xacto knife to make small slit on the top of the jug next to the cap and put a bird feeder chain through as shown in the picture. Then we hung it on a tree next to our patio using a S hook.

DIY Bird House, Kids Crafts, Summer activities for kids, Kids DIY, Kids DIY Bird House

We filled the bird house with wild bird food and we desperately waited for it’s visitors. The birds took couple of days to visit our bird house. Few sparrows and cardinals enjoyed the feed but soon squirrels invaded it. Nonetheless my little one enjoys squirrel watching too so it was still a win for us. 

Hope you enjoy making a bird house with your little one as much as I did. Let me know what you think about our bird house in the comments. I would love to hear from you. Thank you for stopping by. 

Friday, June 19, 2015

Perfect Summer Patio makeover for under 100$

I love dreamy, cozy and colorful patios. We have been living in our apartment since 2 years and our balcony is still empty. Yeah, pretty boring! Finally I made the decision to decorate my patio this summer under budget. Since I din't want to spend huge dollars on something that is going to be burnt in Arizona sun down the years I wanted to keep it simple yet cheery. Yes! Trust me, Sun gets crazy here :) But after living here for two and half years Arizona started feeling home to me. Coming back to my balcony, the walls are too dull in color. So I wanted lots of brightness in everything I add. But the real challenge was that I wanted to get things done under 100$. Here are before and after pictures for you.

Patio makeover under 100$ budget. Make yourself a perfect summer patio that is cozy, comfy and colorful.


Patio makeover under 100$ budget. Make yourself a perfect summer patio that is cozy, comfy and colorful.


Patio makeover under 100$ budget. Make yourself a perfect summer patio that is cozy, comfy and colorful.

Patio makeover under 100$ budget. Make yourself a perfect summer patio that is cozy, comfy and colorful.

I built my color scheme (Pink, yellow, red and white) of decor from the outdoor rug from Ikea that I fell in love with. Its perfect size for our small patio, bright, colorful and even more awesome news is that its 12$!!! unlike other expensive outdoor rugs. Since its made of plastic straws it can with stand rain and sun. Easy to clean up too.

Patio makeover under 100$ budget. Make yourself a perfect summer patio that is cozy, comfy and colorful.


According to my chosen color scheme I started with painting and stenciling my pots with bright floral designs. Here is a link for detailed post on how I did it.

Patio makeover under 100$ budget. Make yourself a perfect summer patio that is cozy, comfy and colorful.


Also, I upcycled few boring old pillows to match my decor, make the space colorful and comfy. Here is a link for detailed procedure on how I stenciled and sew the pillow covers.

Patio makeover under 100$ budget. Make yourself a perfect summer patio that is cozy, comfy and colorful.

I got those green adirondack chairs from Lowe's last summer. The white Ikea stool that we previously had in our den, now works as a side table in our patio.

Patio makeover under 100$ budget. Make yourself a perfect summer patio that is cozy, comfy and colorful.

I wanted to add wooden blinds for the patio front but you know how expensive it gets. I loved the Lill curtains I got from Ikea for their price and they give my patio a cozy look. Adding curtains to my patio made it look more like an indoor than outdoor which makes it even more comfortable for me to enjoy my patio time.

I added nylon rope to the front of patio using screw in hooks to add my curtains on. This is the cheapest way ever to add Curtains. I had nylon rope on hand but if you want to buy some, dollar tree had pretty good stuff.

Then I hung pretty lace edge hanging planters from Ikea and the loveliest terracotta wind chimes that I got from India to front side of my patio.

Patio makeover under 100$ budget. Make yourself a perfect summer patio that is cozy, comfy and colorful.


I upcycled an old dollar store plastic pot as plant stand just by turning it upside down. Pretty cool! Isn't it?


Patio makeover under 100$ budget. Make yourself a perfect summer patio that is cozy, comfy and colorful.


Patio makeover under 100$ budget. Make yourself a perfect summer patio that is cozy, comfy and colorful.


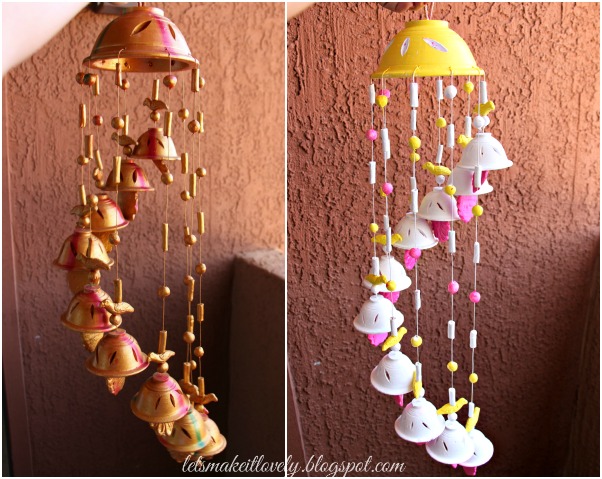
I got these terracotta windchimes on my recent India trip. I just love these wind chimes so much. They make such a melodious music and give me a nostalgic feeling from back home. But I felt the colors didn't quite go well with my patio so, ofcourse I painted them too.

Few more shots for you.

Patio makeover under 100$ budget. Make yourself a perfect summer patio that is cozy, comfy and colorful.


Patio makeover under 100$ budget. Make yourself a perfect summer patio that is cozy, comfy and colorful.

Patio makeover under 100$ budget. Make yourself a perfect summer patio that is cozy, comfy and colorful.

Above 2 pictures are my favorite close up shots. I had those ceramic birds for over 2 years now, they were from Michaels. I got the birdhouse from Joann recently.

Here is the 100$ patio makeover count if you are interested in
2 Adirondack chairs from Lowes for $35.96
Ikea outdoor Rug for $12.99
Lill Lace curtains for $3.99 from Ikea as well
2 hanging planters from Ikea for $11.98
Self watering planters for $25.98 ( If you choose normal planters, you can get this count way less to 10$)
10 inch metal plant stand $4.97 from walmart
White home decor fabric for Pillow Covers $3.96
I painted planters and pillow covers with craft paints I had on hand :)
Those cute little birds, bird house, bird lantern, white stool and dollar planter (that is used as plant stand) were all the things I had lying around the home from long time. As I mentioned earlier the terracotta wind chimes are from India.

Patio makeover under 100$ budget. Make yourself a perfect summer patio that is cozy, comfy and colorful.


Tada! Now here is everything put together. I just love my patio much more now. Let me know what you think about this 100$ patio makeover in your comments. I love to hear from you. Thank you so much for stopping by.

Friday, October 3, 2014

Turn Coke tins into Beautiful Candle Votives


Turn Coke tins into beautiful Candle Votives. DIY Home Decor. Christmas or Diwali Decor. Recycle Crafts. Recycle Crafts.

Be it Diwali or Christmas, this is a perfect craft for the coming up holiday season. Wouldn't it make a lovely gift for friends or family? Or how about just adding a little accent decor piece to any corner in your home? All you need to do is save some soft drink tins and get started. Before I begin on how I did it, let me tell you my inspiration for this one came from these Brass Candle holders when I was searching google images for Diwali decor ideas. Let's get started.

Supplies needed:
  • 3Soft drink tins per votive
  • X-Acto knife
  • Scissors. (I used Micro Serrated Craft scissors like this one through out the process and had no problem of sharp edges in the end product)
  • Marker
  • Hot glue gun
  • Gold color Spray paint 
  • Thick rubber gloves for safety (Kitchen gloves or garden gloves will do)
 
Turn Coke tins into beautiful Candle Votives. DIY Home Decor. Christmas or Diwali Decor.

Make holes next to the top and bottom rims with X-Acto knife. Insert Scissors into the hole and cut around. Cut in middle of the cylinder vertically and make a flat sheet. Straighten any pointed edges using scissors. Save the bottom closure part of coke tin for later.
 

Turn Coke tins into beautiful Candle Votives. DIY Home Decor. Christmas or Diwali Decor. Recycle Crafts.

Draw and cut a petal out of a cardboard piece or cereal box. Using the cut cardboard petal as template, trace petals on the straightened tin piece with a marker and cut them out.


If you are worried about sharp edges in end product prefer a blunt edge petal template instead of sharp one like mine.

Turn Coke tins into beautiful Candle Votives. DIY Home Decor. Christmas or Diwali Decor. Recycle Crafts. 

Place the Petal template on the tin petals, use a blunt ball pen and run through once to curl the petal a little. It might not look great at this point but it sure adds details to the petals once we are done painting them.

Turn Coke tins into beautiful Candle Votives. DIY Home Decor. Christmas or Diwali Decor. Recycle Crafts.

Use hot glue gun and stick the petals to the bottom part of coke tin. You can stick petals in as many layers as you like. I stuck 6 petals per layer and did 3 layers. Doesn't it look beautiful already?

Turn Coke tins into beautiful Candle Votives. DIY Home Decor. Christmas or Diwali Decor. Recycle Crafts.


Use a old carton or newspapers and prepare the area to spray paint. Spray the coke tin flower with your choice of color all the way around. (Its always better to use spray paints outdoor.)

Turn Coke tins into beautiful Candle Votives. DIY Home Decor. Christmas or Diwali Decor. Recycle Crafts.

Here are few clicks to show you how mine turned out.


Turn Coke tins into beautiful Candle Votives. DIY Home Decor. Christmas or Diwali Decor. Recycle Crafts.

Here is a lovely shot at night :)

I love to hear your comments. Thank you for stopping by.


Sunday, July 13, 2014

Eggs Carton Flowers


DIY Eggs Carton Flowers for Serial Lights. Recycle Crafts.


I know, eggs carton flowers are age old kids craft. But I made these flowers to put on serial lights and add to my patio. Do you want to have fun making them with your kids or just by yourself? Then all you need is Eggs carton, Scissors, Craft paints and Serial lights.

DIY Eggs Carton Flowers for Serial Lights

Cut eggs carton pieces into flowers like shown in above pictures.

DIY Eggs Carton Flowers for Serial Lights

Color the flowers with your choice of colors.

DIY Eggs Carton Flowers for Serial Lights

Make a hole at the back of each flower and insert around every light. Make sure to insert the flower around plastic part instead of light itself, as the heated up lights can cause fire on carton.

DIY Eggs Carton Flowers for Serial Lights

Now there you have it! Pretty and colorful lights to beautify your entrance door or patio or any place in your home.

I love to hear your comments and thanks for stopping by.

Tuesday, July 8, 2014

Upcycled Fabric Basket

I love organizing things in style. I found most of the fabric baskets ridiculously priced, especially those bigger ones and they are not washable (by mistake when you spill something on it). After a few beginner's projects with my new sewing machine, I have decided to sew a fabric covered basket from the carton boxes.

Upcycled Fabric Basket from Cartons

Here are the things you need:
  • Carton 
  • Scissors 
  • Duck tape or Packing tape
  • Fabric of your choice (Think upcycling your favorite old bed sheets or pillow cases )
  • Velcro
  • Sewing thread (I used black to show the stitches. You can choose one that matches your fabric color)
  • Measuring tape
  • Sewing machine or hand stitch needle
  • Ribbon (optional)
Make a box of desired size from the carton you have. ( If you already like the size of box you have go ahead and start with fabric.)


Upcycled Fabric Basket from Cartons

Measure and cut equal size of squares from all the 4 corners. Shape it into a box and duck tape around twice.

Upcycled Fabric Basket from Cartons

For the fabric liner, make a box out of fabric which is 1inch taller than your carton box. (Make sure you leave seam allowances while cutting your fabric.)

Upcycled Fabric Basket from Cartons

Above shown is my fabric liner 1" taller than my box.


Upcycled Fabric Basket from Cartons

For outer cover, make one more fabric box of same size as your carton box .

Upcycled Fabric Basket from Cartons

Cut 4 pieces of velcro (hook and loop fabric tape) and stitch to all four corners of boxes. Make sure you stitch velcro tape on outside of fabric cover and inside (stitches side) of fabric liner.

Upcycled Fabric Basket from Cartons

(I stitched loop tape to outer cover and hook tape to fabric liner.)


Upcycled Fabric Basket from Cartons

Lets put everything together :) Insert your carton box in fabric cover and insert fabric liner inside carton. Now just fold the liner around and seal with velcro. Add a cute ribbon if you have one. That is it :)


Upcycled Fabric Basket from Cartons

Isn't it cute and easy? And coming to the washing part, if you spill something on it just open the velcro tape and toss your fabric into washing machine. If your carton box got spoiled too, just upcycle one more carton. I am sure in this online shopping century you get almost everything delivered in boxes.

Upcycled Fabric Basket from Cartons

Now get your stuff organized.
Please leave your comments and thank you for stopping by :)


Sunday, June 22, 2014

Reuse Six Pack Bottle Carrier


Reuse Six Pack Bottle Carrier

Use Self Adhesive Shelf Liners from Dollar stores to cover Six pack bottle carrier and organize your Craft Supplies.


You can also try the same trick on cereal boxes and use them to sort your Craft ribbons, Decorative tapes and Scrapbook stickers.

Reuse Six Pack Bottle Carrier and Cereal Boxes to Organize

Here is a peek into my craft drawer. I Can't even imagine dumping all those craft supplies into the drawer without these organizers.

Let me know your comments. Thank you for stopping by.