Tabs

home aboutme homedecor recycle sew organize gallery
Showing posts with label Organize. Show all posts

Wednesday, March 21, 2018

Little Projects for my Little one - Part 1

I am very excited writing this post as I am finally going to show you few of my teeny projects I did for my little one. You can be sure there is more coming, I can't wait to get to her first birthday post yet. I didn't give up crafting at all, its just hard to make time for blogging these days. I hope I will find a way soon.

Baby Booties. Pink Crochet Shoes. Floral baby shoes.

Here comes the most adorable project, Crochet Shoes. Actually this was the last project I did in my 9th month of pregnancy waiting for my little angel to step out. I was literally impatient counting days to see my princess. But I wanted to share this project first because, come on whats more cuter than handmade pink shoes of newborn. I followed multiple tutorials from YouTube to make these.


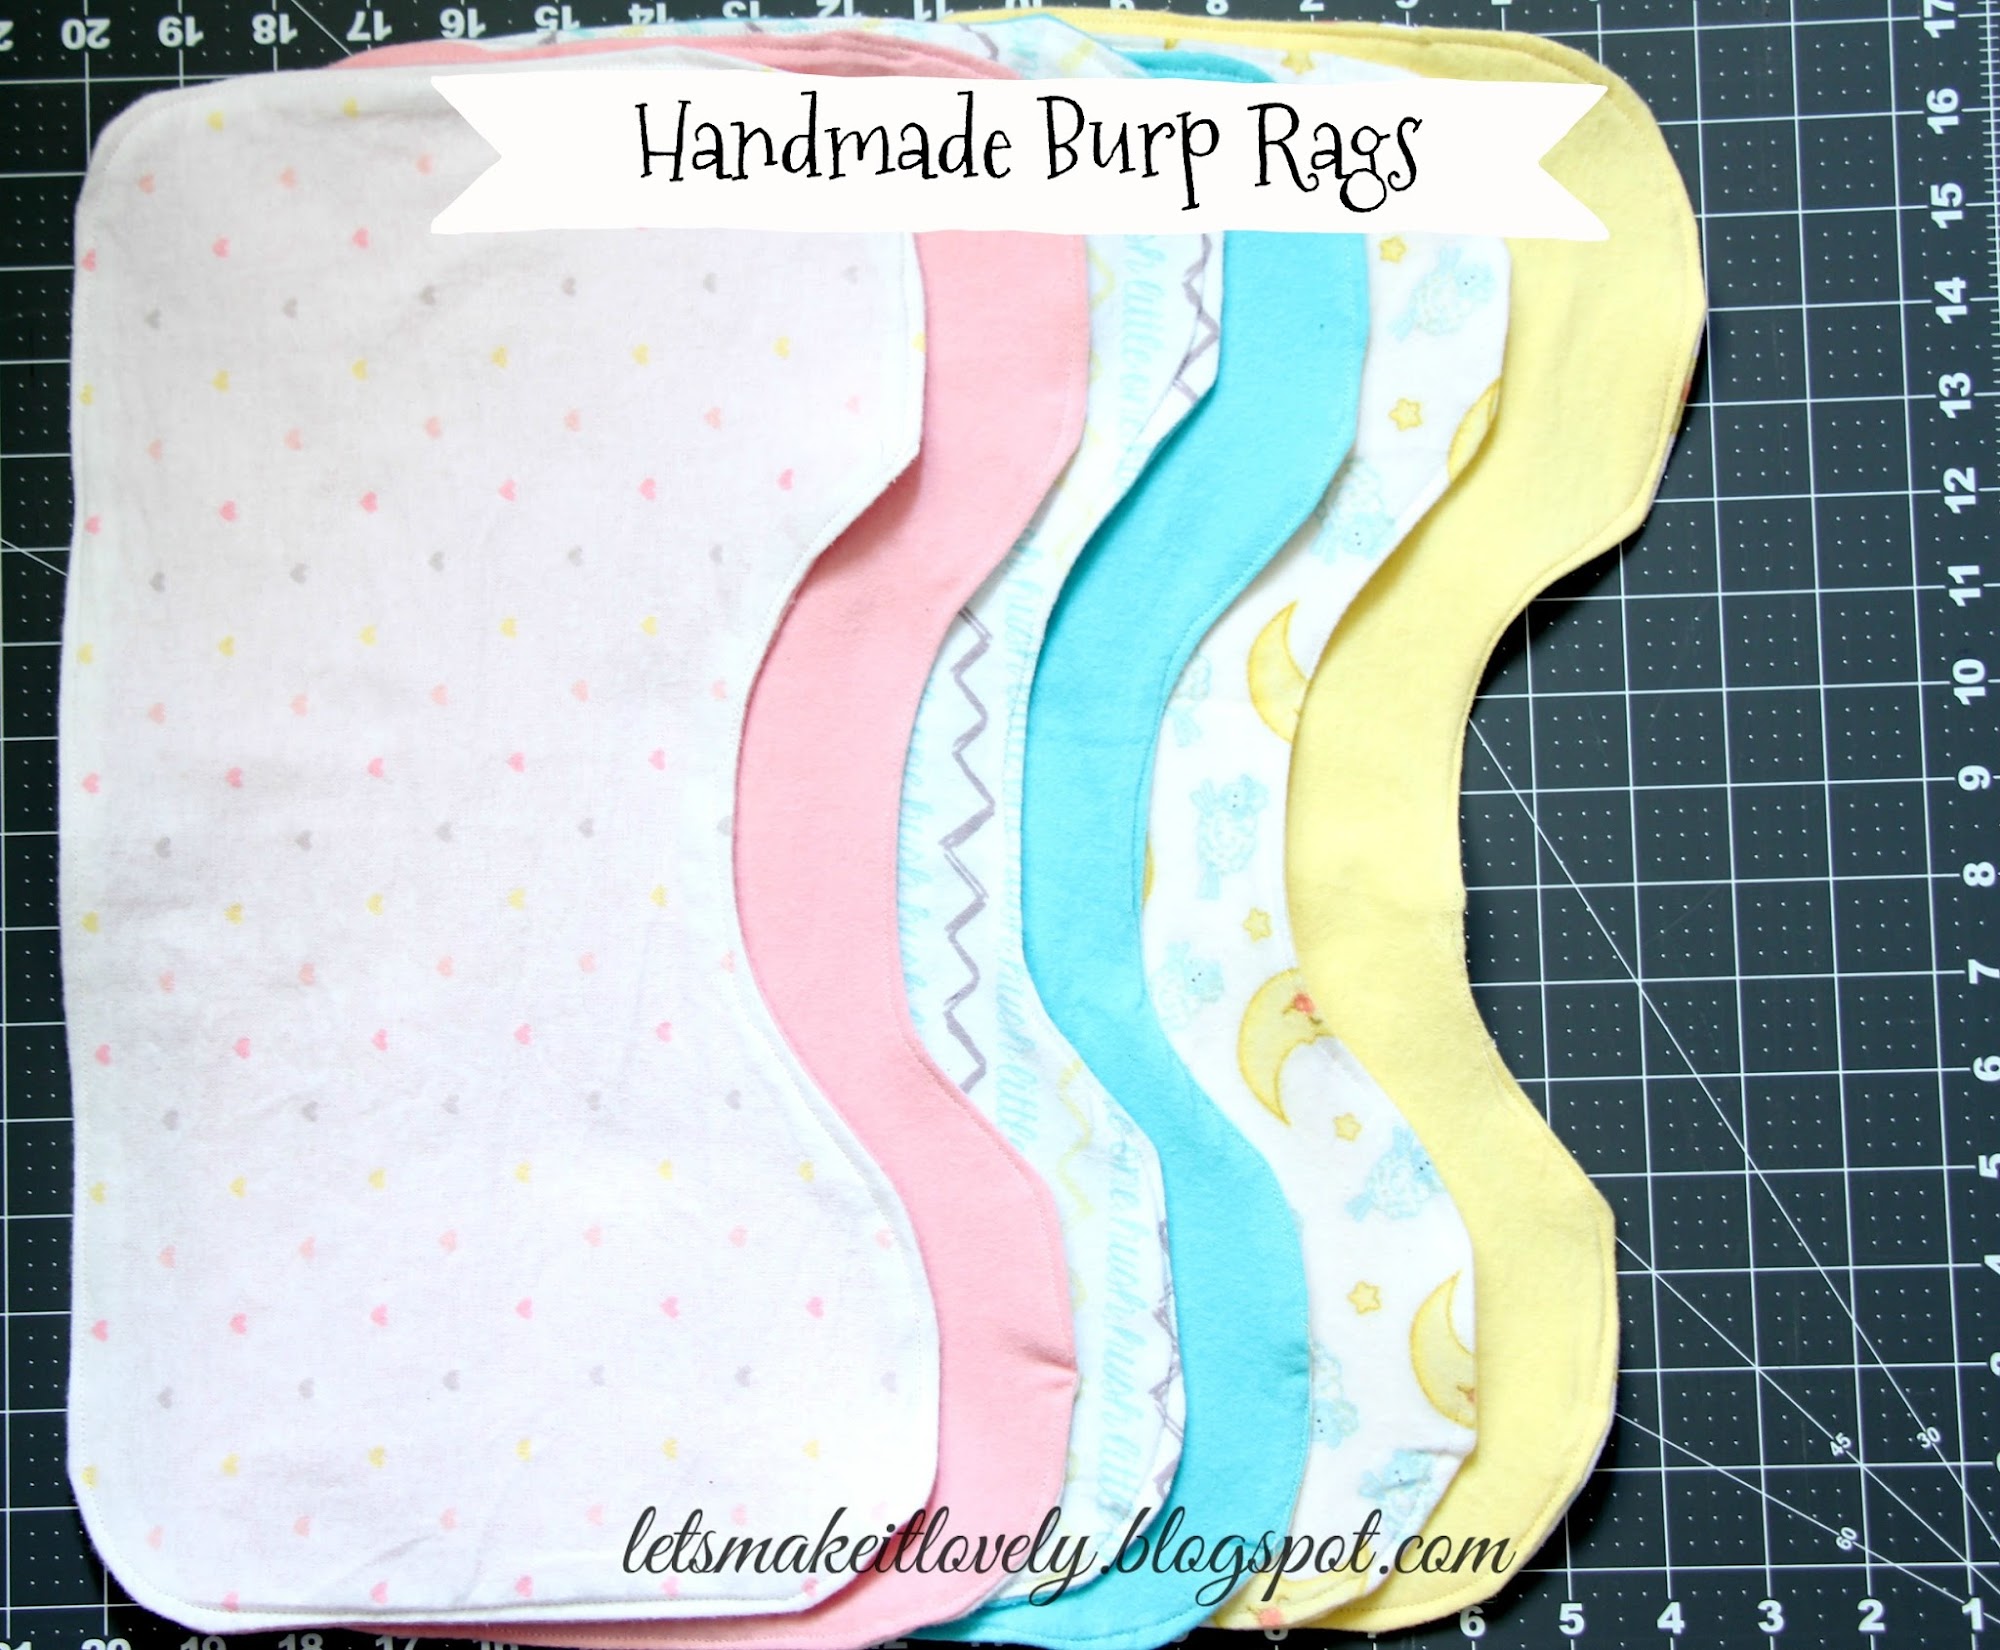
Handmade Burp Rags. Soft Burp rags. Sew Burp Rags.

I and my mom sew up these burp rags and hand towels just because we love handmade projects. They are super cute and super soft. I used nursery fannel fabric from Joann. God I was lost looking at all the pretty fabrics they have for little ones.

Handmade Burp Rags. Soft Burp rags. Sew Burp Rags.

I followed the tutorial and template from My Happy Nursery for the burp rags. If you don't know what burp rags are they are soft clothes that go over mother or any care taker's shoulder and catch spit up from baby's burps while carrying them.


Baby Essential on the go. Sew Diaper Clutch. Handmade Diaper Clutch with zipper. Internal Zipper Pocket.

This was a fun one day project for me. I sew this exactly like how I sew my make up pouch except I increased the measurements so that it can hold 2 diapers, small wipes case. I also added an internal zipper pocket for Desitin or any other small essentials and a wristlet to keep my hands free. This clutch came very handy many times especially in flight journeys.

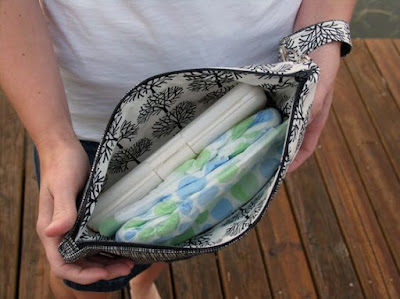
Baby Essential on the go. Sew Diaper Clutch. Handmade Diaper Clutch with zipper. Internal Zipper Pocket.

If you are looking for a internal zipper tutorial here is a good one to follow.

Baby Essential on the go. Sew Diaper Clutch. Handmade Diaper Clutch with zipper. Internal Zipper Pocket.

This etsy listing was the one that inspired my diaper clutch.


Organize Cards. Card Wallet. Sew Card Wallet.

Though its not exactly baby related, Card Wallet was another fun project I did when I was pregnant to keep my bag little more organized before baby arrival. This one took little more time than I thought to get all the measurement markings and calculations correct. 

Organize Cards. Card Wallet. Sew Card Wallet.

I took a whole lot of pictures of making this card wallet so that I can write a tutorial but I guess it will take me forever to write tutorials now with all the work piled up. So here is another wonderful tutorial from Infarrantly Creative if you want to make one.

There are a lot more little projects I did that I want to share a glimpse of. Will try to post again soon. I am really trying hard to keep myself motivated to continue blogging. Share your views and comments to keep me on track. I really love to read them. Thank you for stopping by.

Saturday, August 9, 2014

Sew a Grocery Bag Holder


Sew a Grocery Bag Holder Tutorial
  
Most of us reuse grocery bags as trash liners or carry out bags. But where do you store them all? For many days I had tuck them at random places in my kitchen. Today I sew a grocery bag holder to put them all in a place and to pull one easily when I need. Now, here I am happily sharing how to sew it :)

Sew a Grocery Bag Holder Tutorial

Cut 20x13 inch pieces from external fabric, interface and lining fabric. (If you don't need the stiffness, you can skip interface and lining. Just go ahead with external fabric.)

 Sew a Grocery Bag Holder Tutorial 

Fuse the interface with external fabric. Align it with lining and make a 1/2 inch seam at the top.

Sew a Grocery Bag Holder Tutorial

Make 3/4th inch seam on another side leave the seam open on the ends. This seam goes towards the bottom of bag holder.

Sew a Grocery Bag Holder Tutorial

Fold the fabric layers into half with external sides together and sew with 1/4th inch seam.

Sew a Grocery Bag Holder Tutorial

Cut 8 inches of 1/2inch wide elastic and insert into bottom open seam. Sew close the elastic and seam open.

Now for the handle take 13x4 inches piece and fold it into 13x1 inches and sew along edges as shown in picture.

Sew the handle to the top opening.

Sew a Grocery Bag Holder Tutorial

That is it! We are done. 

Sew a Grocery Bag Holder Tutorial

Hang your grocery bag holder in pantry or kitchen. Insert your grocery bags into your bag holder from top opening and pull one at at time from bottom opening.

Thank you for stopping by. I love to hear your comments :) 

Tuesday, July 8, 2014

Upcycled Fabric Basket

I love organizing things in style. I found most of the fabric baskets ridiculously priced, especially those bigger ones and they are not washable (by mistake when you spill something on it). After a few beginner's projects with my new sewing machine, I have decided to sew a fabric covered basket from the carton boxes.

Upcycled Fabric Basket from Cartons

Here are the things you need:
  • Carton 
  • Scissors 
  • Duck tape or Packing tape
  • Fabric of your choice (Think upcycling your favorite old bed sheets or pillow cases )
  • Velcro
  • Sewing thread (I used black to show the stitches. You can choose one that matches your fabric color)
  • Measuring tape
  • Sewing machine or hand stitch needle
  • Ribbon (optional)
Make a box of desired size from the carton you have. ( If you already like the size of box you have go ahead and start with fabric.)


Upcycled Fabric Basket from Cartons

Measure and cut equal size of squares from all the 4 corners. Shape it into a box and duck tape around twice.

Upcycled Fabric Basket from Cartons

For the fabric liner, make a box out of fabric which is 1inch taller than your carton box. (Make sure you leave seam allowances while cutting your fabric.)

Upcycled Fabric Basket from Cartons

Above shown is my fabric liner 1" taller than my box.


Upcycled Fabric Basket from Cartons

For outer cover, make one more fabric box of same size as your carton box .

Upcycled Fabric Basket from Cartons

Cut 4 pieces of velcro (hook and loop fabric tape) and stitch to all four corners of boxes. Make sure you stitch velcro tape on outside of fabric cover and inside (stitches side) of fabric liner.

Upcycled Fabric Basket from Cartons

(I stitched loop tape to outer cover and hook tape to fabric liner.)


Upcycled Fabric Basket from Cartons

Lets put everything together :) Insert your carton box in fabric cover and insert fabric liner inside carton. Now just fold the liner around and seal with velcro. Add a cute ribbon if you have one. That is it :)


Upcycled Fabric Basket from Cartons

Isn't it cute and easy? And coming to the washing part, if you spill something on it just open the velcro tape and toss your fabric into washing machine. If your carton box got spoiled too, just upcycle one more carton. I am sure in this online shopping century you get almost everything delivered in boxes.

Upcycled Fabric Basket from Cartons

Now get your stuff organized.
Please leave your comments and thank you for stopping by :)


Monday, June 30, 2014

DIY Entryway Coat Rack

Hi friends,

This floating shelf coat rack idea was on my mind for a long time to organize our home entry way. When I got this beautiful candle votive as a gift I couldn't find excuses for making it any more (Thank you Chandana). First let me show you the end result.

DIY Entryway Coat Rack

 I am happy to share with you how to make it, incase you want to make one for yourself.


Supplies Needed:
DIY Entryway Coat Rack

  • 20cm x 6cm wooden plank of 2cm thickness
  • 18cm x 8cm wooden plank of 2cm thickness
  • Wooden casing of your choice (optional)
  • Wood glue
  • 3 of 2inches Dry wall screws
  • 3 Coat hooks
  • Drilling machine
  • 3 of 1inch finishing nails
  • Spray paint of your choice
  • Sand Paper 
  • Pencil to mark
( I got all my wood supplies and screws from Home Depot, Coat hooks and spray paint from Walmart and I had drilling machine on hand.)

Let's get started!

DIY Entryway Coat Rack


Mark and drill 3 holes on wooden planks as shown. (Don't worry if you have never drilled before, its easy peasy job. Just follow the instructions on your drilling machine.)

DIY Entryway Coat Rack


Using dry wall screws, screw the two wooden pieces together at the drilled holes.

DIY Entryway Coat Rack

 Glue the wooden casing in place using wood glue and secure it with 1 inch finishing nails.

DIY Entryway Coat Rack

Sand the uneven edges with sand paper.

DIY Entryway Coat Rack


Take it outdoor and prepare the place for paint. (Cover the place with old sheets or unused carton or garbage covers.) Spray the entire work piece with 2 coats of spray paint. (Follow instructions on your spray paint)

DIY Entryway Coat Rack

Let the paint dry completely. Space the coat hooks evenly and mark the spots to drill. Now drill and screw the hooks in place.

DIY Entryway Coat Rack


Add the sawtooth hangers or key hole hangers to the back of coat rack and hang it on the wall.

DIY Entryway Coat Rack

Put photo frames, small vases or candles on the shelf to decorate it :) I used this beautiful candle votive.

DIY Entryway Coat Rack


I think this is a great way to both organize and decorate your entry way. I love to hear your comments. Thank you for stopping by.
Follow my blog with Bloglovin

Sunday, June 22, 2014

Reuse Six Pack Bottle Carrier


Reuse Six Pack Bottle Carrier

Use Self Adhesive Shelf Liners from Dollar stores to cover Six pack bottle carrier and organize your Craft Supplies.


You can also try the same trick on cereal boxes and use them to sort your Craft ribbons, Decorative tapes and Scrapbook stickers.

Reuse Six Pack Bottle Carrier and Cereal Boxes to Organize

Here is a peek into my craft drawer. I Can't even imagine dumping all those craft supplies into the drawer without these organizers.

Let me know your comments. Thank you for stopping by.

Monday, June 2, 2014

Reuse Salt Containers in your Style


Reuse Salt Containers in your Style

Want to know a simple way to reuse your salt containers? Here you go.

Reuse Salt Containers in your Style

Just grab those salt containers and cut those top closures with X-Acto knife, then remove the Paper covering. Now just stick your choice of gift wrap or scrapbook paper on to those containers and Mod Podge all over. You are done.

Now you can organize pretty much anything in it. Stationery supplies, Kitchen utensils, Make up brushes, Paint brushes, Craft Supplies and what not I leave it to your imagination.

What do you like to organize with these lovely DIY containers?
Let me know in your comments.
Thank you for stopping by.

Sunday, June 1, 2014

DIY Customized Makeup Drawer Organizer


First let me show you how my makeup drawer looked at its best for a while. 

DIY Customized Makeup Drawer Organizer

Yeah most of the days its messier than this and it was tough to find those thin eyeliners and lip pencils when I needed them. Most of the organizers I found at stores wouldn't fit in my drawer and I don't like those counter top display organizers where things can get dusty. 

DIY Customized Makeup Drawer Organizer


So I decided to put my cereal box collection to use again and make a customized makeup drawer organizer. Do you want to know how I made it? Ofcourse, I love to share with you. (Let me tell you I do not have loads of makeup products like many do but I can show you a way how to organize yours.)

DIY Customized Makeup Drawer Organizer

I Measured my drawer dimensions and started sketching how I want to organize.
 And the supplies used were Cereal boxes, Measuring tape, Scissors, Glue, Gift wrap and Mod podge.

DIY Customized Makeup Drawer Organizer

For the face products section I could use the cereal bars box. Cut another cereal bars box at 3 inches height from bottom to make eye makeup section. 

DIY Customized Makeup Drawer Organizer

I cut out a Larger cereal box and added a piece in middle of it to divide to make the behind sections for perfumes and makeup tools. 


I wanted pretty small sections for my lipsticks and cotton swabs so I drew desired size of each compartment on the cereal box carton, cut them and glued them.

DIY Customized Makeup Drawer Organizer

Next I glued all the individual boxes together and filled any gaps with stuffed carton pieces.
Pretty long story huh? Yeah yeah yeah I am almost there.

DIY Customized Makeup Drawer Organizer
 
Finally I covered this master piece with gift wrap and Mod podged all over to finish it. That is it! 

DIY Customized Makeup Drawer Organizer

I think it just looks lovely and organized now. What do you think?

Please leave your comments. Thank you for stopping by.