Tabs

home aboutme homedecor recycle sew organize gallery
Showing posts with label Sew. Show all posts

Wednesday, March 21, 2018

Little Projects for my Little one - Part 1

I am very excited writing this post as I am finally going to show you few of my teeny projects I did for my little one. You can be sure there is more coming, I can't wait to get to her first birthday post yet. I didn't give up crafting at all, its just hard to make time for blogging these days. I hope I will find a way soon.

Baby Booties. Pink Crochet Shoes. Floral baby shoes.

Here comes the most adorable project, Crochet Shoes. Actually this was the last project I did in my 9th month of pregnancy waiting for my little angel to step out. I was literally impatient counting days to see my princess. But I wanted to share this project first because, come on whats more cuter than handmade pink shoes of newborn. I followed multiple tutorials from YouTube to make these.


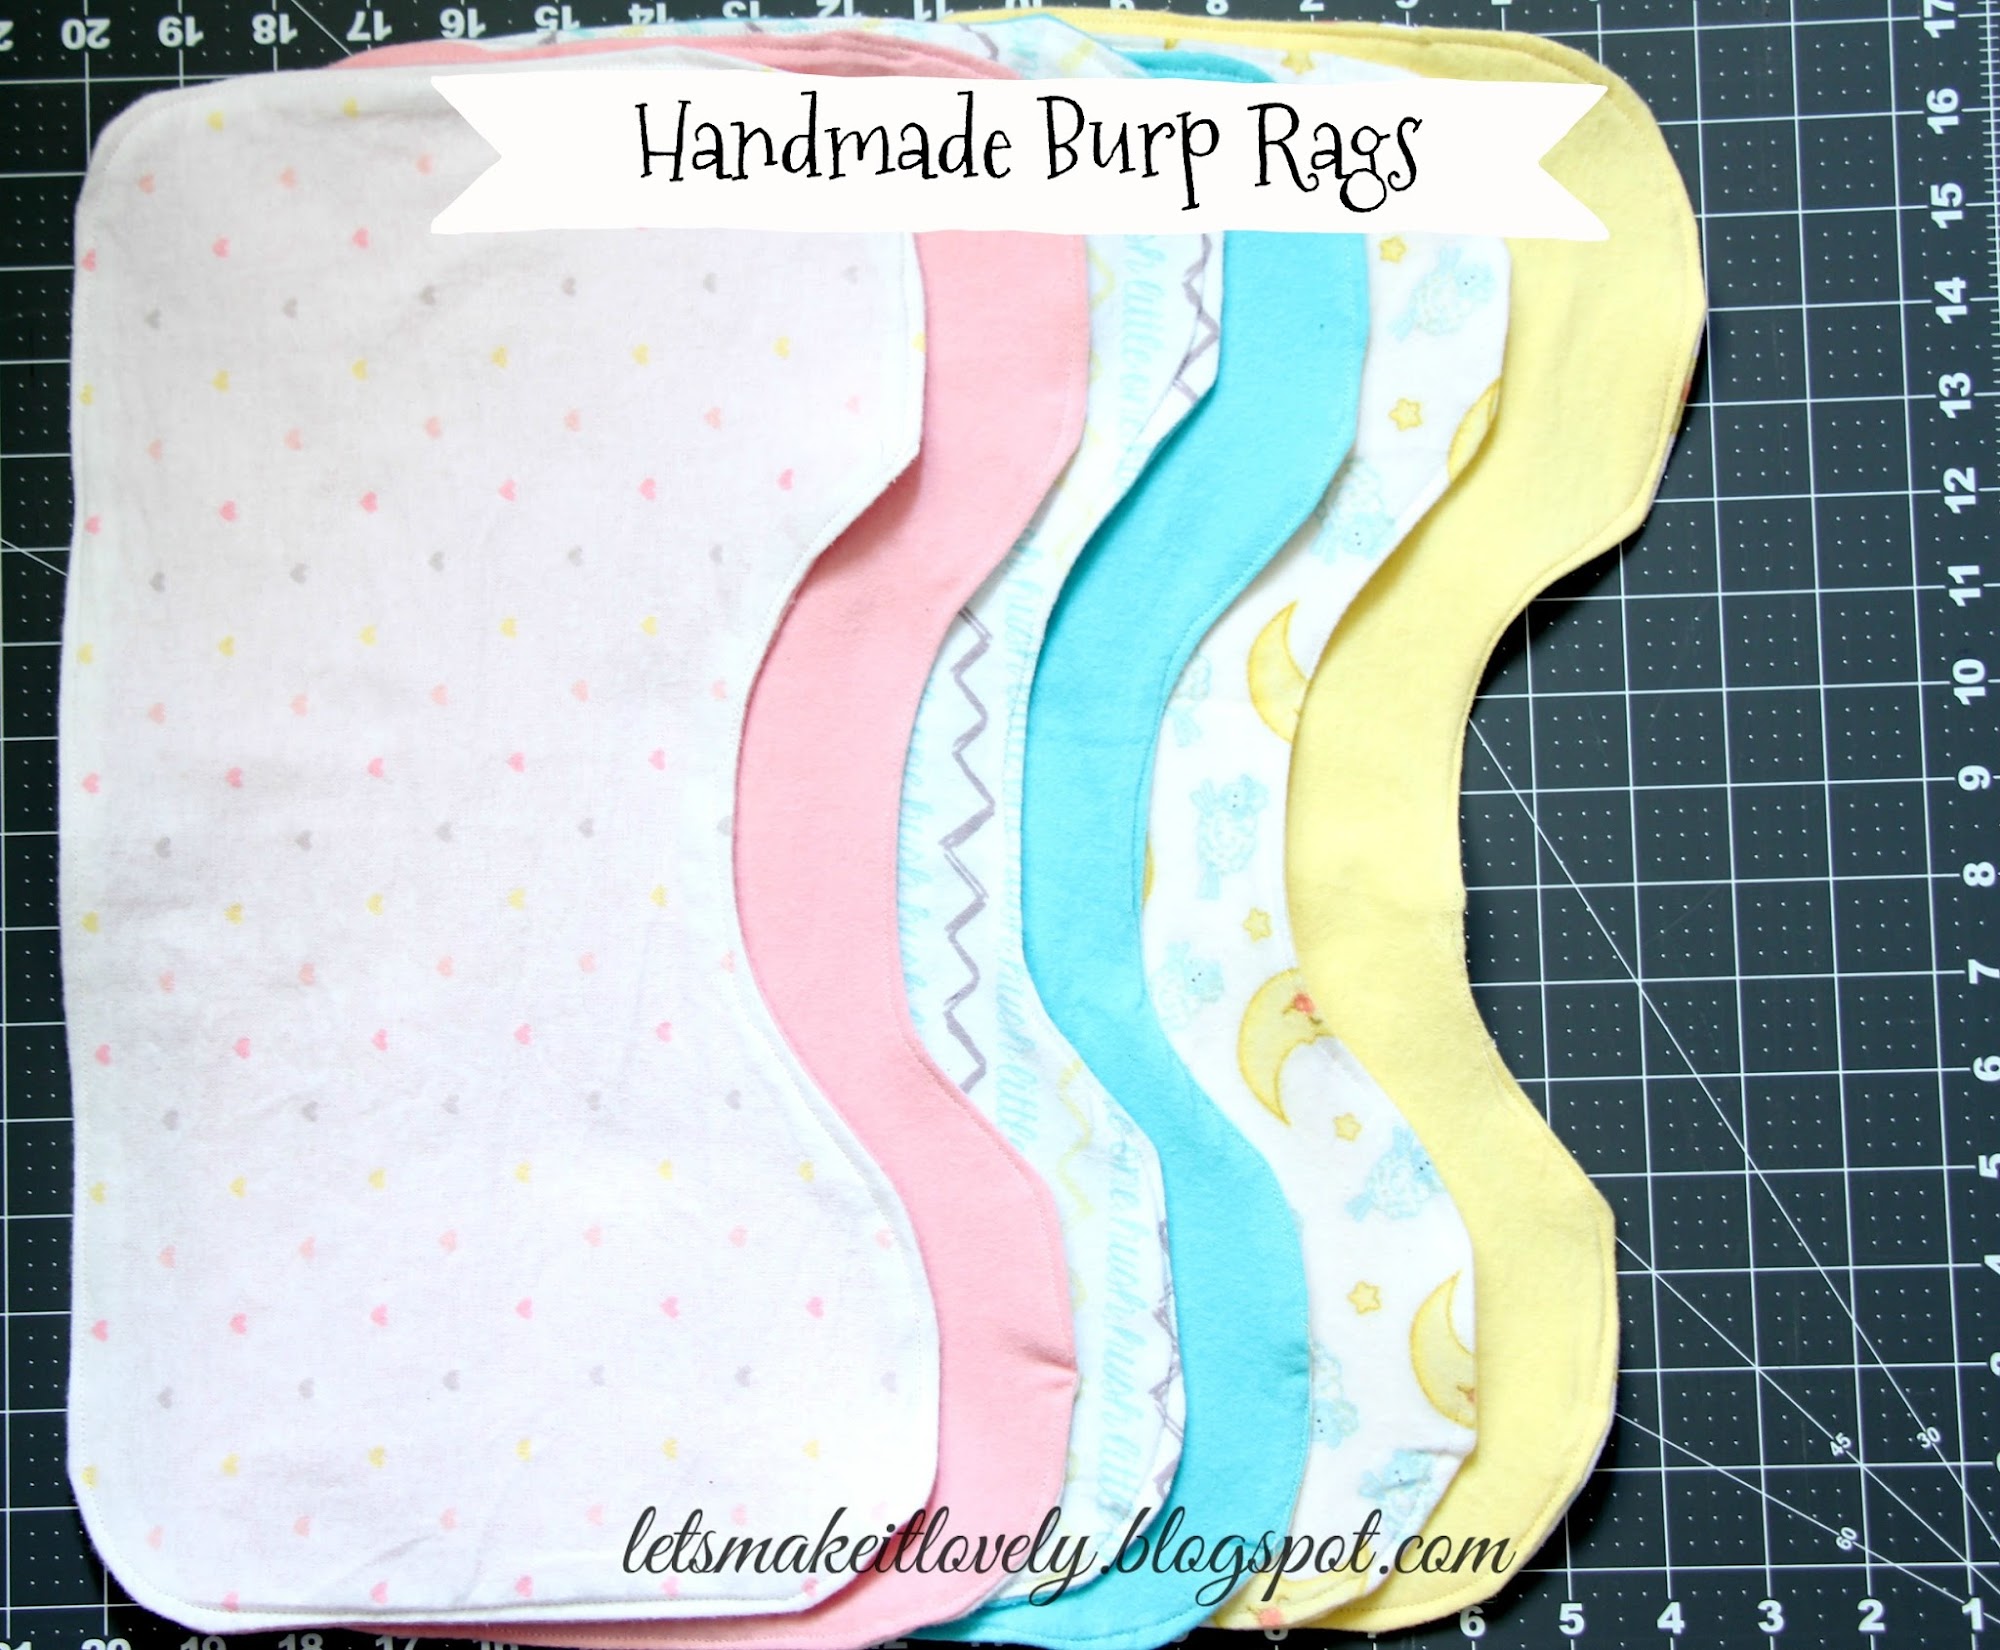
Handmade Burp Rags. Soft Burp rags. Sew Burp Rags.

I and my mom sew up these burp rags and hand towels just because we love handmade projects. They are super cute and super soft. I used nursery fannel fabric from Joann. God I was lost looking at all the pretty fabrics they have for little ones.

Handmade Burp Rags. Soft Burp rags. Sew Burp Rags.

I followed the tutorial and template from My Happy Nursery for the burp rags. If you don't know what burp rags are they are soft clothes that go over mother or any care taker's shoulder and catch spit up from baby's burps while carrying them.


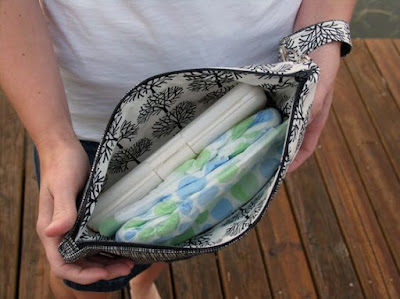
Baby Essential on the go. Sew Diaper Clutch. Handmade Diaper Clutch with zipper. Internal Zipper Pocket.

This was a fun one day project for me. I sew this exactly like how I sew my make up pouch except I increased the measurements so that it can hold 2 diapers, small wipes case. I also added an internal zipper pocket for Desitin or any other small essentials and a wristlet to keep my hands free. This clutch came very handy many times especially in flight journeys.

Baby Essential on the go. Sew Diaper Clutch. Handmade Diaper Clutch with zipper. Internal Zipper Pocket.

If you are looking for a internal zipper tutorial here is a good one to follow.

Baby Essential on the go. Sew Diaper Clutch. Handmade Diaper Clutch with zipper. Internal Zipper Pocket.

This etsy listing was the one that inspired my diaper clutch.


Organize Cards. Card Wallet. Sew Card Wallet.

Though its not exactly baby related, Card Wallet was another fun project I did when I was pregnant to keep my bag little more organized before baby arrival. This one took little more time than I thought to get all the measurement markings and calculations correct. 

Organize Cards. Card Wallet. Sew Card Wallet.

I took a whole lot of pictures of making this card wallet so that I can write a tutorial but I guess it will take me forever to write tutorials now with all the work piled up. So here is another wonderful tutorial from Infarrantly Creative if you want to make one.

There are a lot more little projects I did that I want to share a glimpse of. Will try to post again soon. I am really trying hard to keep myself motivated to continue blogging. Share your views and comments to keep me on track. I really love to read them. Thank you for stopping by.

Thursday, May 19, 2016

Sew a Simple Summer Skirt

Hi friends, it's been long time. Hope you are all doing well. I am here to share with you a simple half skirt tutorial. I made this at the end of last summer and reserved it until this summer to post. Yes, LOL. Its simplest skirt ever. After all a beginner like me could sew it. There are a lot of expert tutorials on how to sew the same, but I wanted to share with you what helped me as a beginner.

Sew a simple summer skirt. Half circle skirt for beginners. Sewing projects for beginners.


Grab your sewing machine, fabric, sewing essentials, 1 inch wide elastic and let's get started.
You just need 2 measurements to finish this skirt. 1. Height of the skirt you want. and 2. waist measurement where you want your elastic to fall. Once you measure these 2 head over to circle skirt app to calculate waist radius and fabric length required. The app handles all the math for you so you don't have to worry. Isn't it cool? The one I am showing here is for half circle skirt.


Sew a simple summer skirt. Half circle skirt for beginners. Sewing projects for beginners.

Lay your fabric flat.

Sew a simple summer skirt. Half circle skirt for beginners. Sewing projects for beginners.

Fold it in half.

Sew a simple summer skirt. Half circle skirt for beginners. Sewing projects for beginners.

Take a string and tie it to marking pencil. Cut the string at the length of your waist radius obtained from the app. (mine was 7")

Sew a simple summer skirt. Half circle skirt for beginners. Sewing projects for beginners.

Place the loose end of string at a corner (which has one folded side and one open side of fabric) use your pencil as shown above and draw an arc just like you would do with a geometric compass.
Draw another arc with our skirt length as length of the string, using the same fabric corner as fixed point.

Sew a simple summer skirt. Half circle skirt for beginners. Sewing projects for beginners.

Cut along the markings.

Sew a simple summer skirt. Half circle skirt for beginners. Sewing projects for beginners.

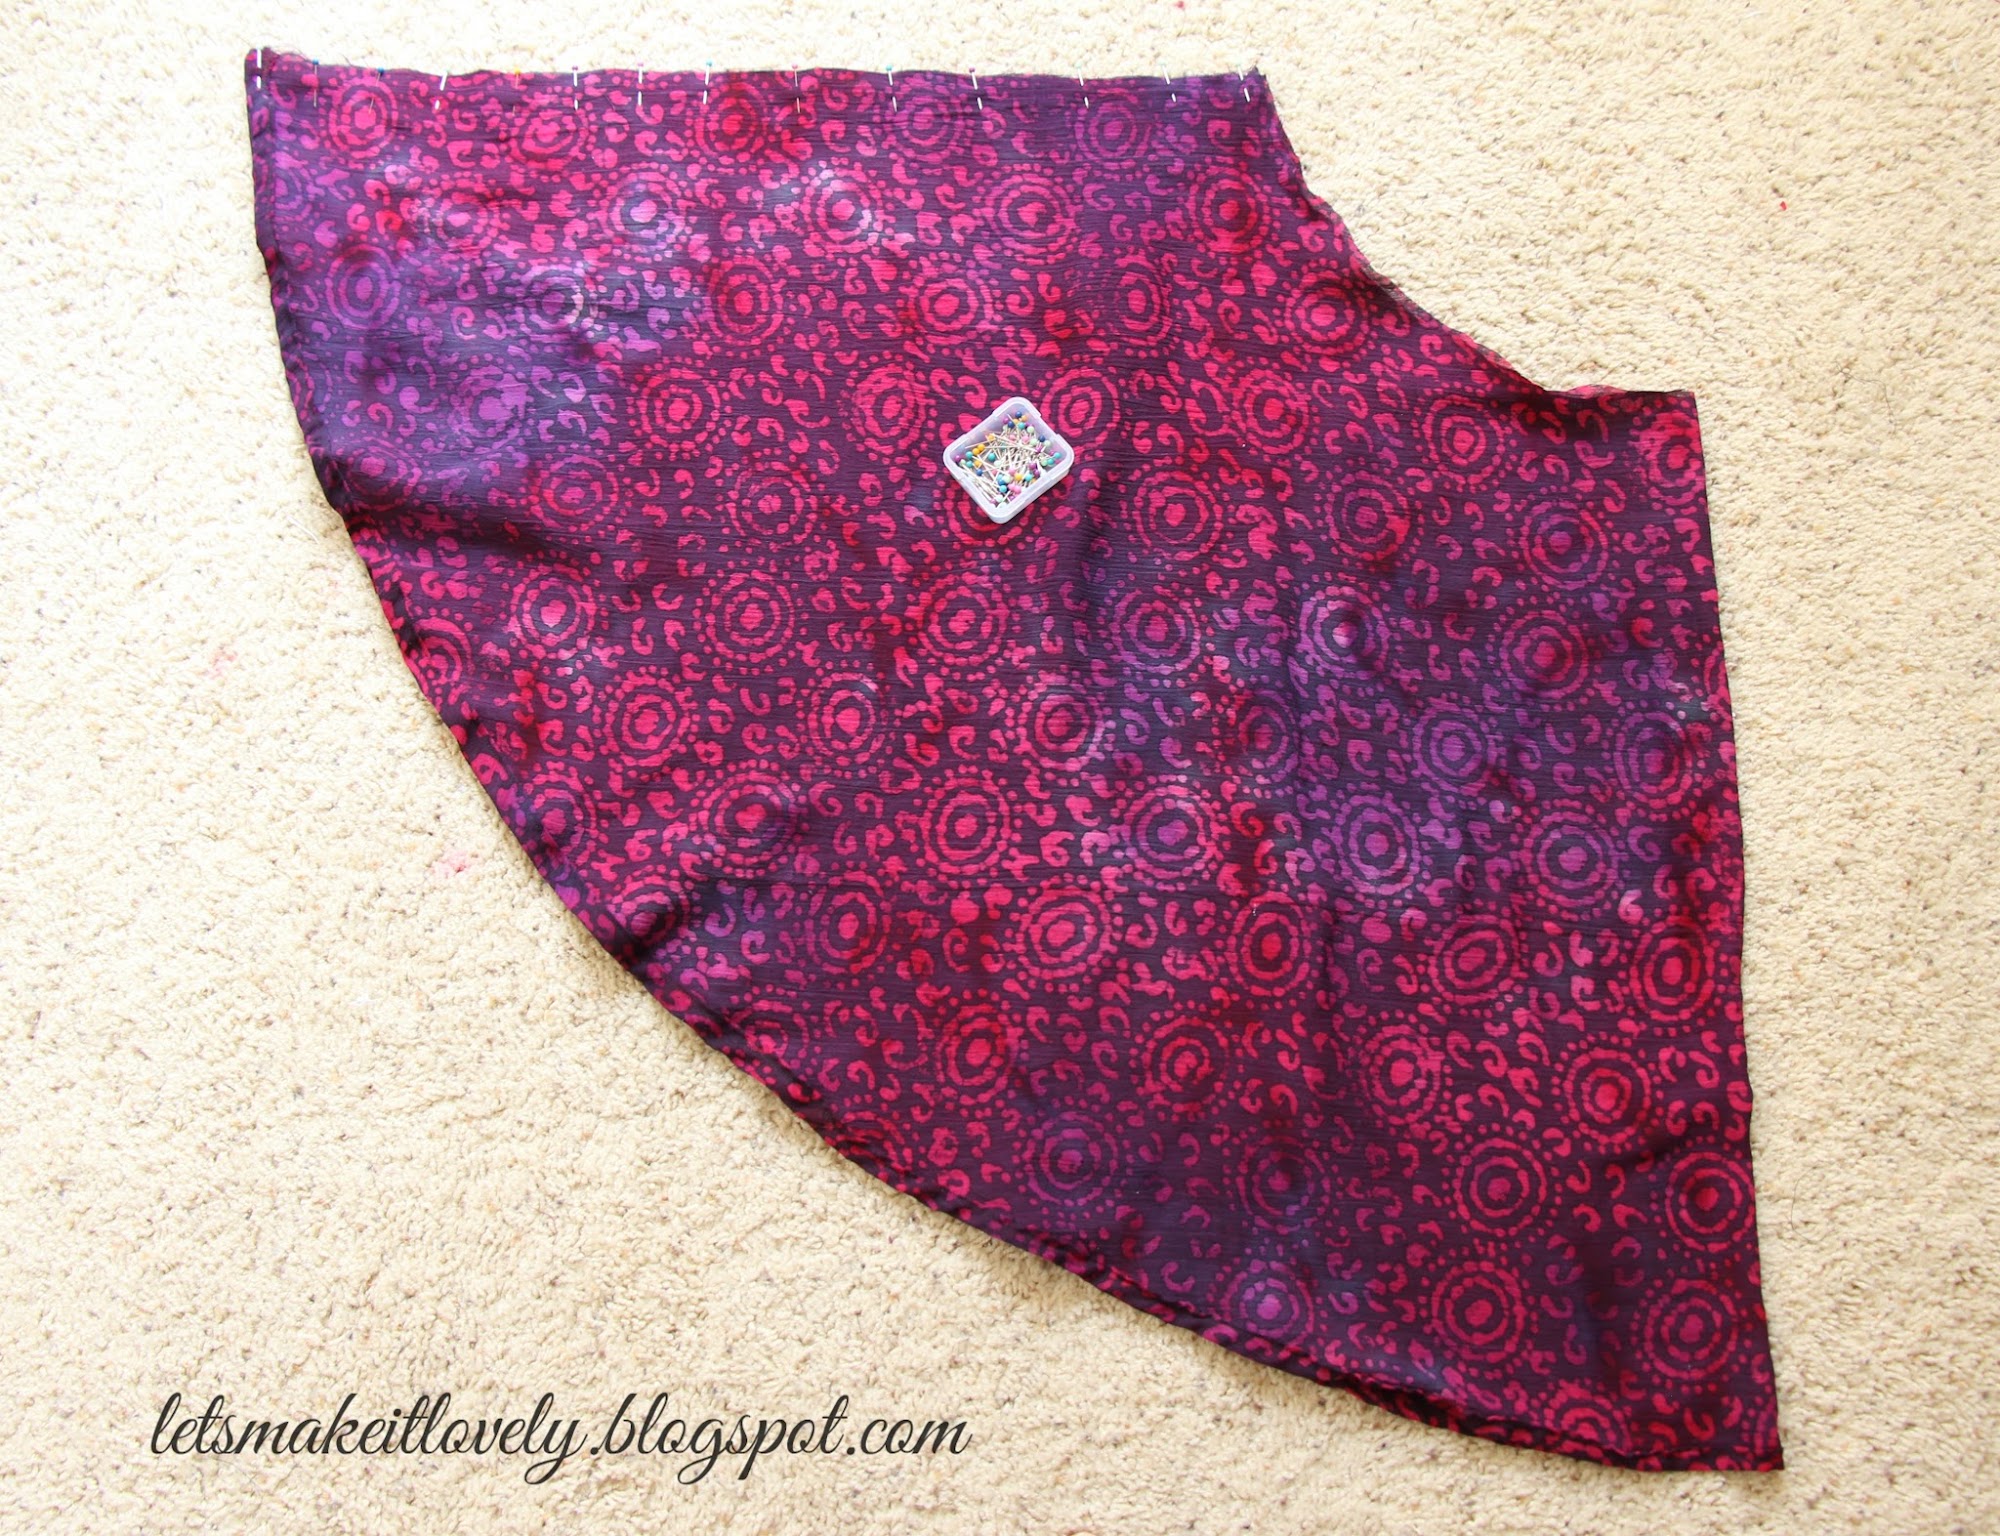
Now your fabric should look like this.

Sew a simple summer skirt. Half circle skirt for beginners. Sewing projects for beginners.

Open up the fabric and it should look just like half circle as shown above.

Sew a simple summer skirt. Half circle skirt for beginners. Sewing projects for beginners.

Double fold and iron the bottom seam.  


Sew a simple summer skirt. Half circle skirt for beginners. Sewing projects for beginners.

Stitch the bottom seam.

Sew a simple summer skirt. Half circle skirt for beginners. Sewing projects for beginners.

Pin the open side of the skirt and stitch.

Sew a simple summer skirt. Half circle skirt for beginners. Sewing projects for beginners.

Take 4 inch wide fabric as long as your waist plus half inch for seam allowance.

Sew a simple summer skirt. Half circle skirt for beginners. Sewing projects for beginners.

Sew close the fabric to form a band as shown above.


Sew a simple summer skirt. Half circle skirt for beginners. Sewing projects for beginners.

Fold the band in half and Iron.

Sew a simple summer skirt. Half circle skirt for beginners. Sewing projects for beginners.

Join the band with top end of the skirt, leaving a 2 inch gap to insert elastic. I used extra pins for the 2 inch gap so that I don't forget and sew along.

Sew a simple summer skirt. Half circle skirt for beginners. Sewing projects for beginners.

Insert the elastic using safety pin technique. Pull out the open ends of elastic.

Sew a simple summer skirt. Half circle skirt for beginners. Sewing projects for beginners.

Using zig-zag stitch join the 2 ends of elastic as shown.

Sew a simple summer skirt. Half circle skirt for beginners. Sewing projects for beginners.

Push the elastic inside waist band and sew close the 2 inch opening. If your fabric looks like it might fray a lot like mine did, use an extra zigzag stitch or serge along the raw edges.

Sew a simple summer skirt. Half circle skirt for beginners. Sewing projects for beginners.

That is it! Your skirt is ready. Now rock your summer with pretty skirts and cool tank tops. Happy Summer! Thank you for stopping by. As always I love to hear your comments.


Saturday, June 6, 2015

Paint and Sew Pillow Covers Tutorial

As I mentioned in my previous post, I started putting together my patio. I got my andorak chairs from Lowes last summer and I really like their green color. However, I wanted to add a stroke of brightness and what's a better way to add color to chairs than comfy cushions. Since I decided to challenge myself with a 100$ budget for my entire patio makeover, I wanted to upcycle stuff that I already had on hand as much as I can. So here is a before and after picture of my pillows.

Stenciling and Sewing pillow cover tutorial. Beginner sewing project.


The brown decorative pillows are from our old comforter set. The comforter had to leave our home after a lot of wear and tear and I saved the decorative pillows as they were in pretty good shape. The cushion with orange and green shades is my favorite pillow that sits on my sofa with me, though its odd one out in our living room decor I really love it because that pillow cover is the first sewing project on my sewing machine. I decided to upgrade these 3 pillows for my patio chairs.

Things used:
  • 1/2 yard white home decor fabric (for white pillow fronts) 
  • 1/2 yard of white denim from my fabric stash (for pillow backs. Ofcouse you could go ahead and use outdoor fabric or home decor fabric for backside too but I just wanted to use the fabric I already had.)
  • Yellow Polka dot fabric quarter
  • Pink fabric piece for rosettes 
  • Hot glue gun
  • Stencils
  • Acrylic craft paints
  • Textile medium (If you are using fabric acrylic paints you don't need textile medium)
  • Paint brushes (You can use Stencil brushes. I just went ahead with paint brushes as I had them on hand)
  • Temporary fabric marker (optional)

First, I prewashed my white home decor fabric on which I planned to stencil.
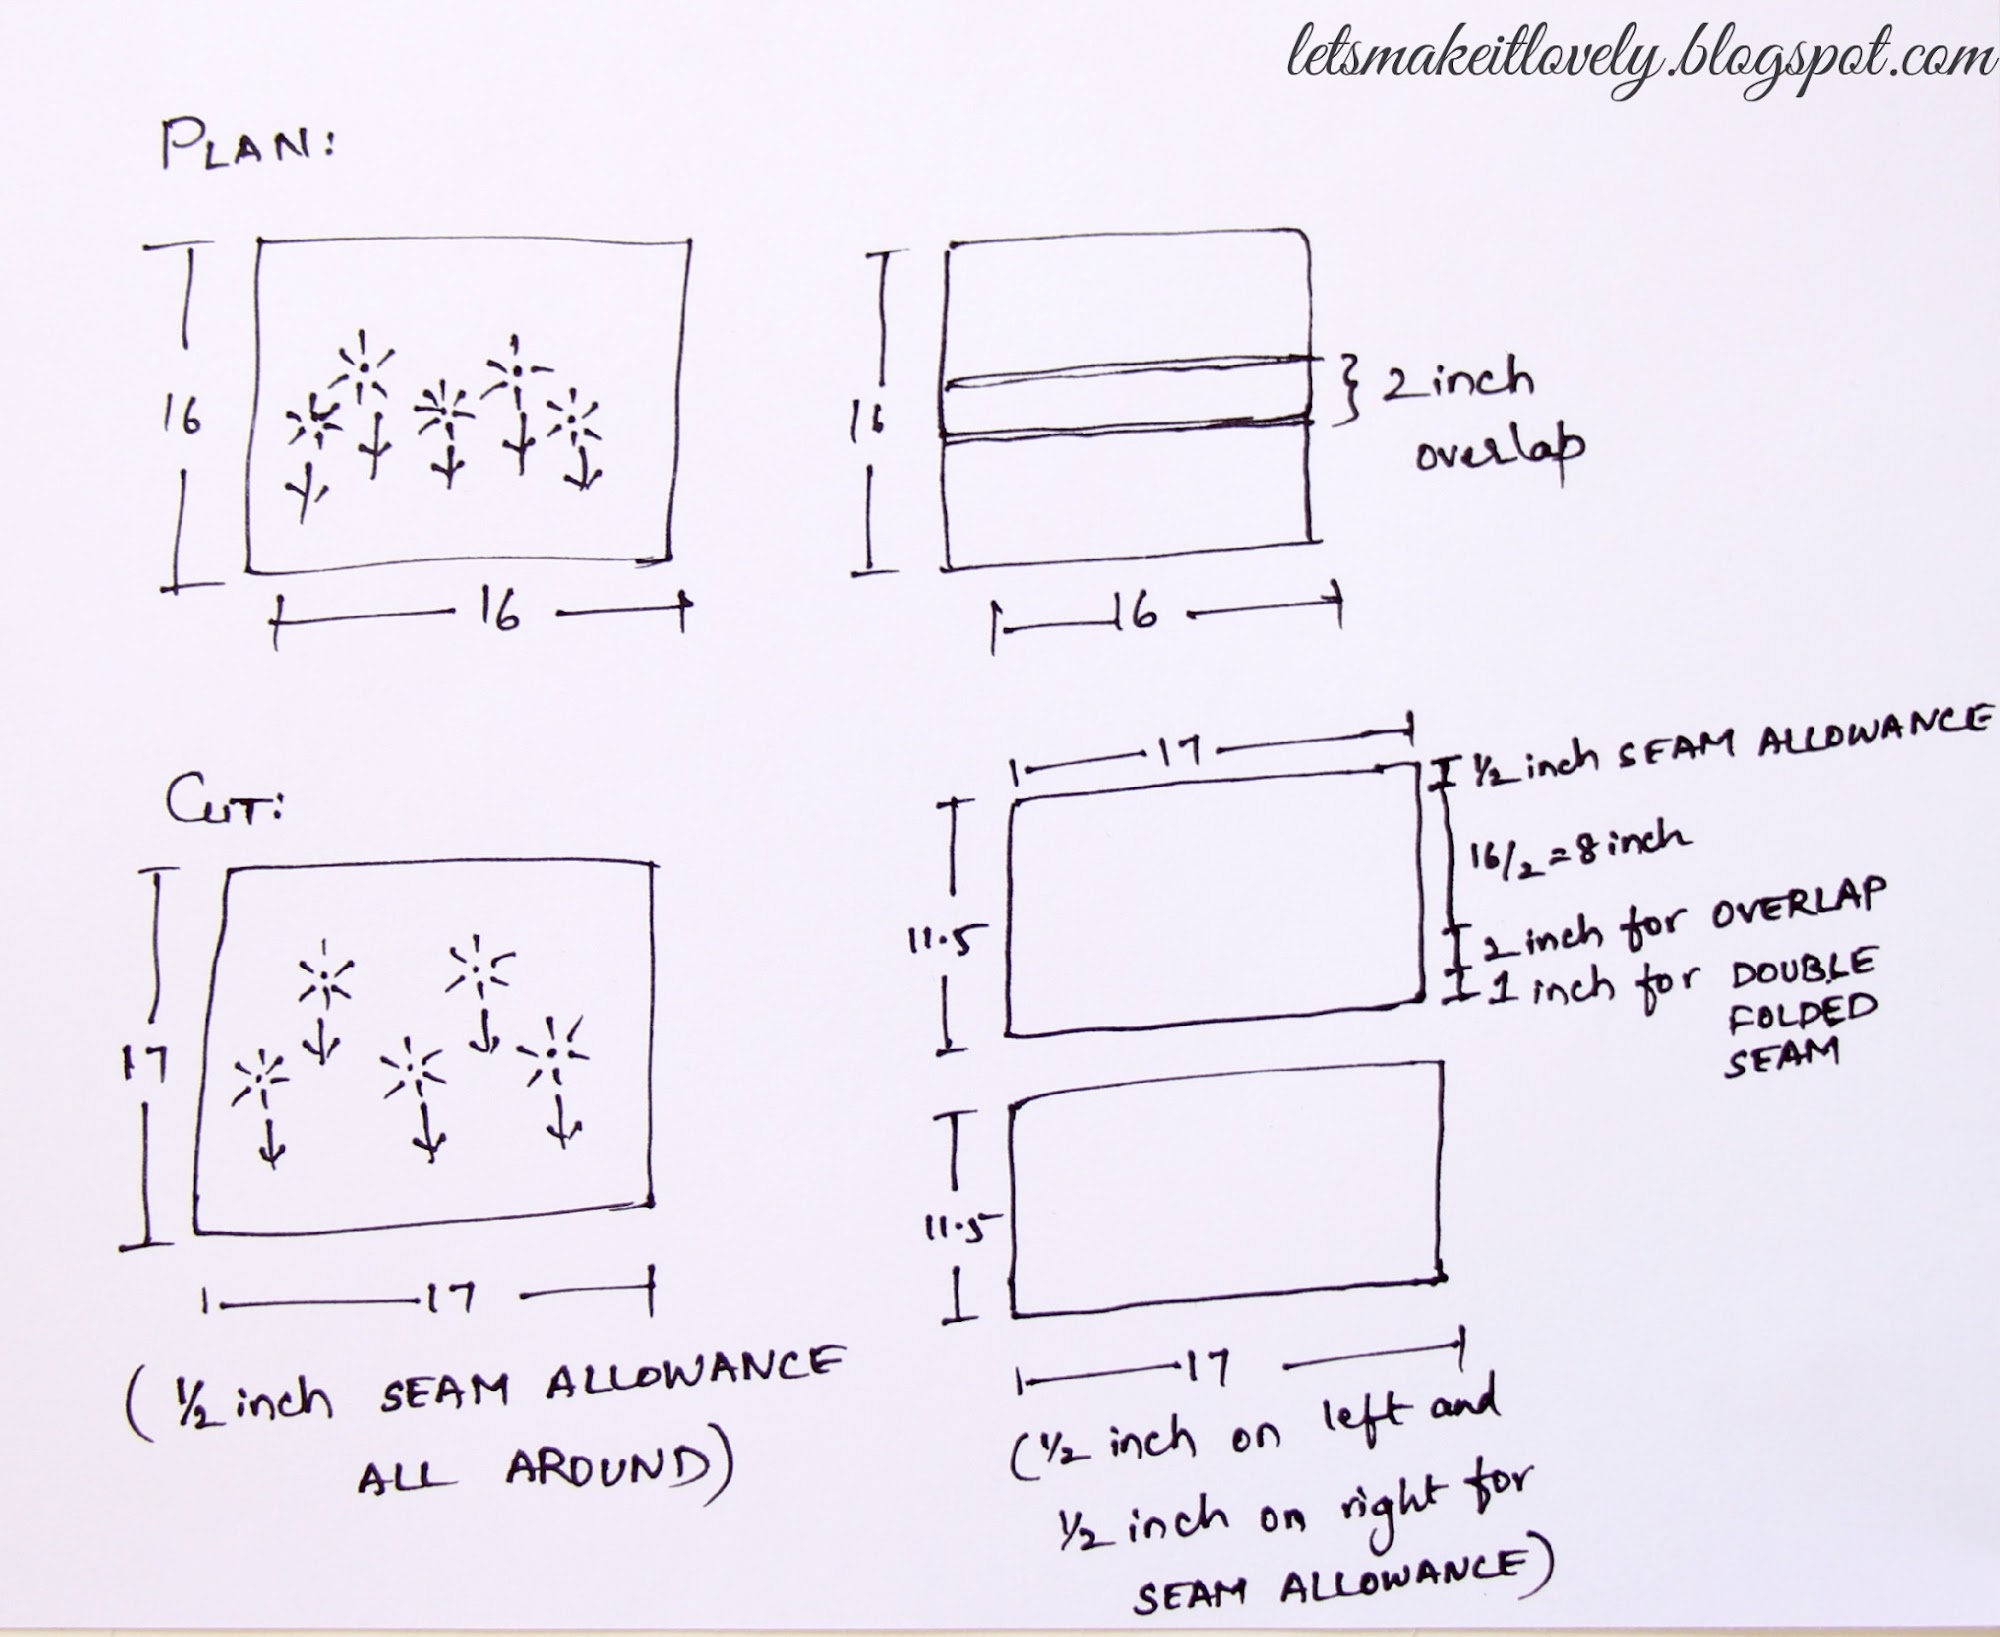
My 2 big pillows measure 16 x 16, so I cut 2 of 17 x 17 white home decor fabric pieces to stencil on. These 2 pieces are going to be front side of my 16 x 16 pillows with half inch seam allowance on all the four sides.

Stenciling and Sewing pillow cover tutorial. Beginner sewing project.


As I was using craft acrylic paints that are not made for fabric I mixed it with textile medium to turn it into fabric paint. Yes! you can do that. I tested this method on a scrap fabric before starting this project and I just loved the results. Just follow the instructions on your textile medium bottle. Mine requires a heat set after 24 hours dry time and then the fabric is good to go, even into the washer. God!!! this unleashed tons of cute little fabric painting project ideas for me.


Stenciling and Sewing pillow cover tutorial. Beginner sewing project.

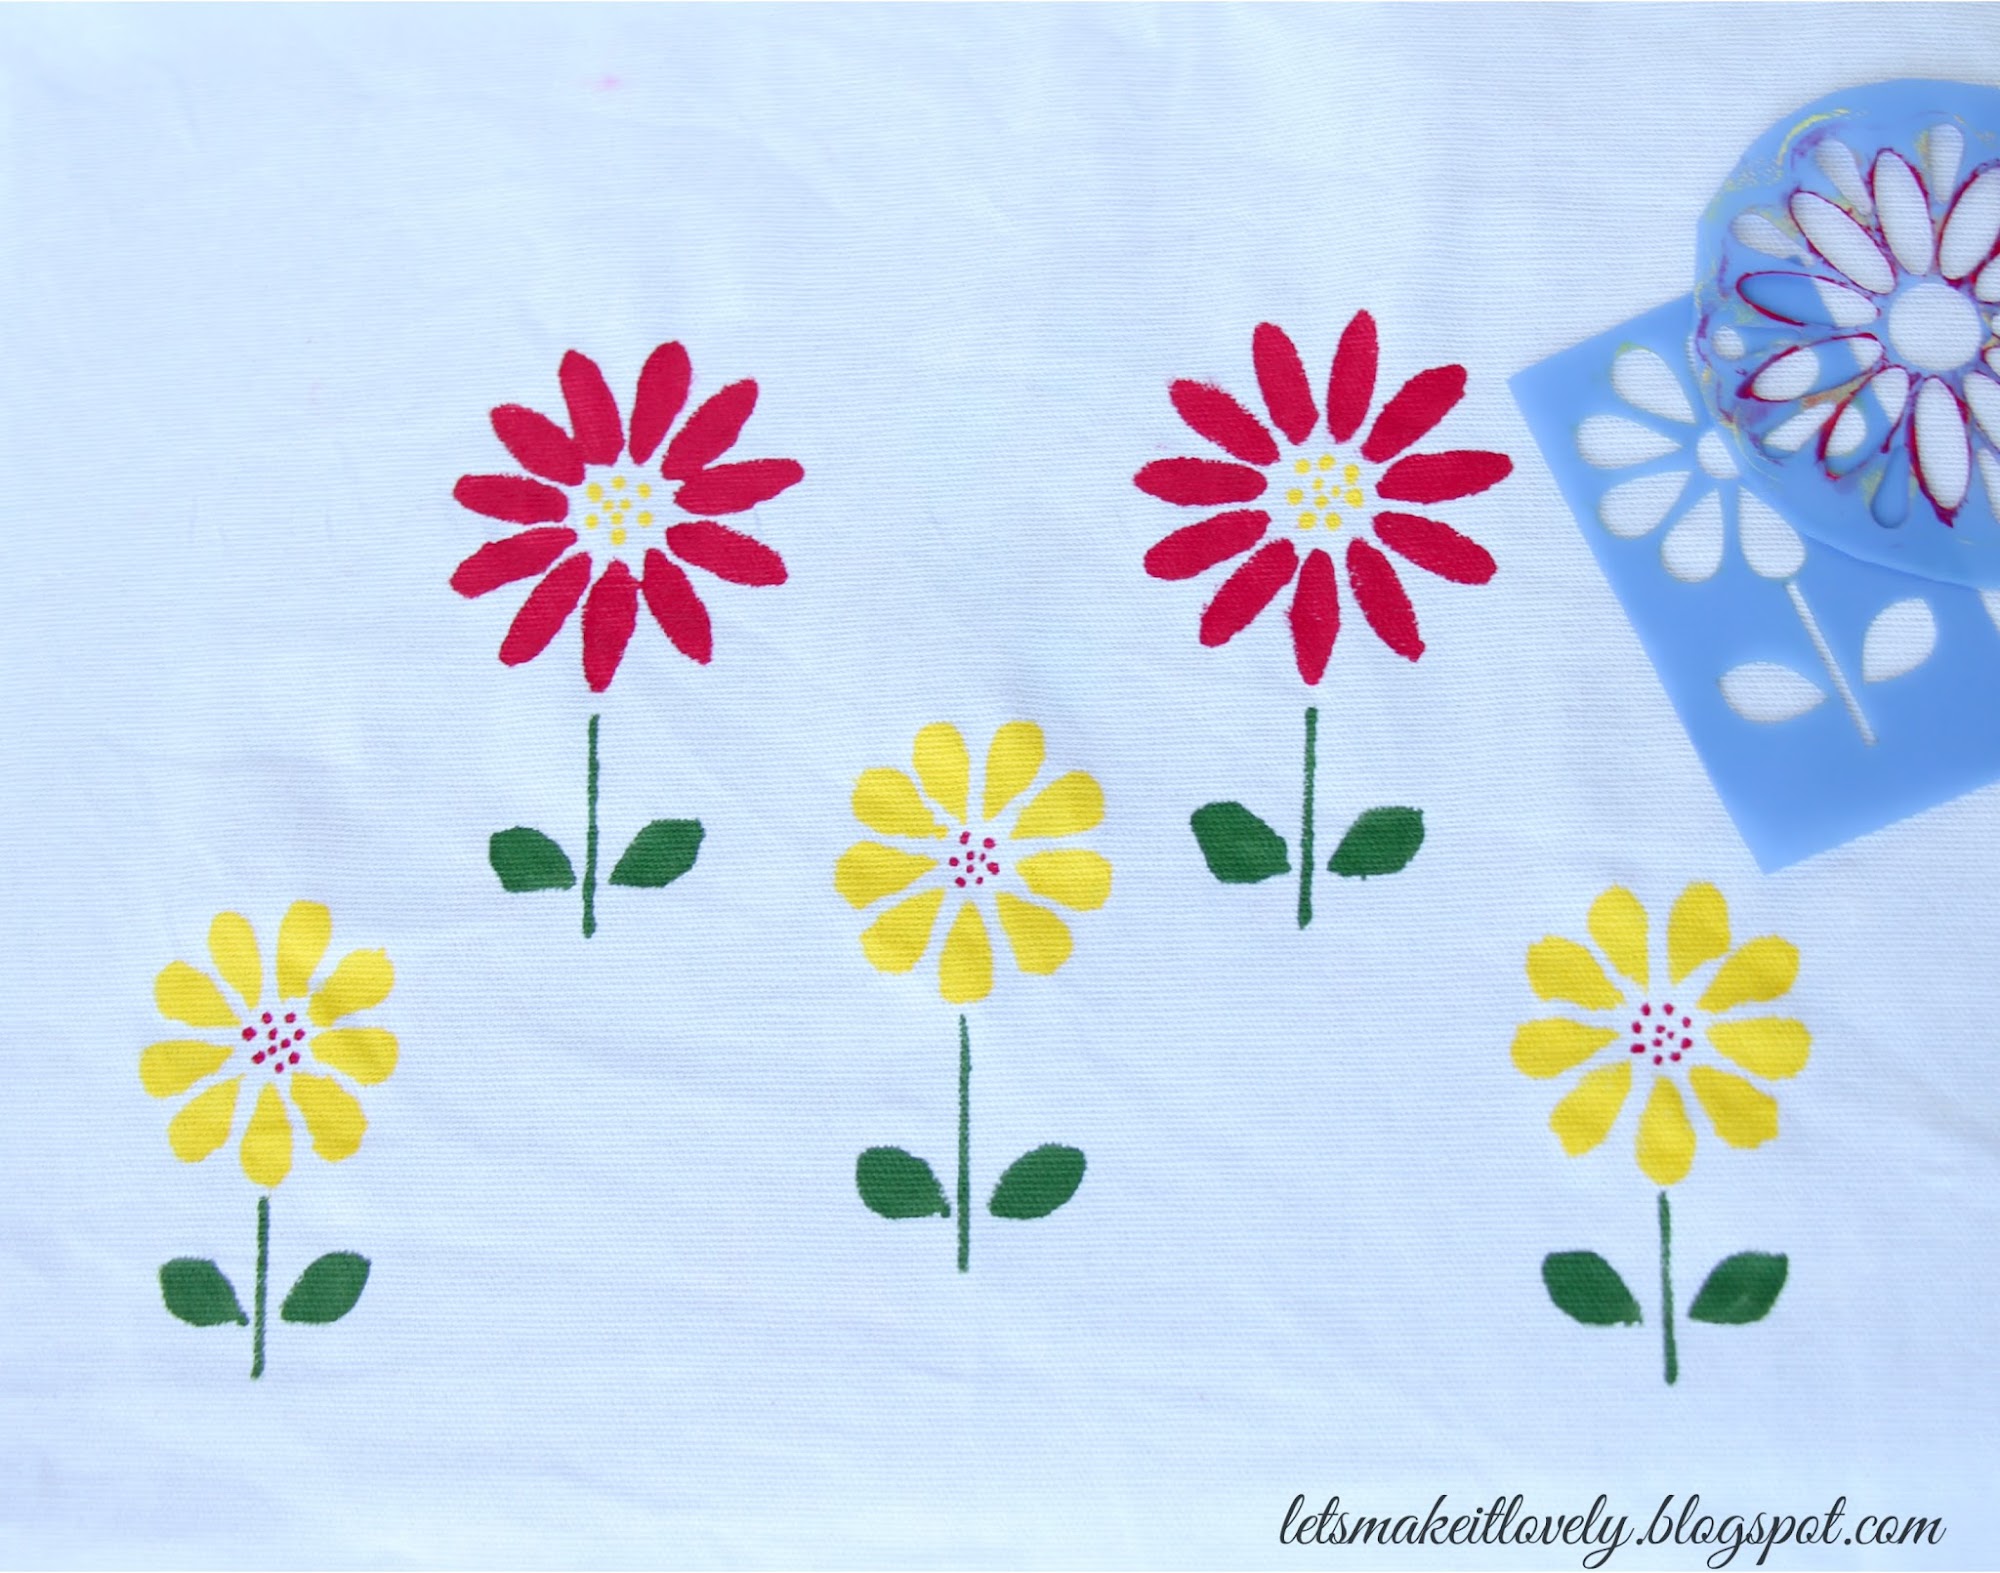
I planned a floral wreath design for one of the pillows. Placing my dinner plates upside down on the fabric I traced 2 concentric circles with temporary fabric marker. Then I started stenciling the flowers all around the circle and I hand painted few branches and leaves to connect the flowers. I felt I had more control over the paint when I used paint brushes instead of stencil pouncers on fabric. If you want to know more on how to stencil in detail, refer to my pot stenciling post where I mentioned dos and don'ts on stenciling.

Stenciling and Sewing pillow cover tutorial. Beginner sewing project.

 I am no expert in stenciling, I did end up with flared petals and weird shaped flowers which I craft-fully turned into something pretty (or atleast I think so). In the above picture one of the pink flower petals is clearly flared too much and which is why I gave the entire flower a red color edge to make it look less obvious. The red flower is a disaster. I was trying to stencil very small flower with pouncer and ended up covering it with circular petals using my paint brush.

Stenciling and Sewing pillow cover tutorial. Beginner sewing project.

Here is one more example of adding green stem right where the yellow paint seeped through the stencil. After these mistakes I shifted to paint brushes from pouncers and they worked great. Hey! Lesson learnt. 

Stenciling and Sewing pillow cover tutorial. Beginner sewing project.

Use narrow tip brushes to paint small flowers, leaves and thin stems. (Try to design something creative if you do end up with little paint mistakes.)

Stenciling and Sewing pillow cover tutorial. Beginner sewing project.

Stenciling and Sewing pillow cover tutorial. Beginner sewing project.

This is how my 2 stenciled fabric pieces looked like once I am done. I was initially planning to add text in the middle of wreath design like "Smile" or "Relax". But I really liked how they turned out and wasn't daring enough to paint something on it and loose what I already think looks pretty enough.

Pillow cover Sewing Tutorial

Sewing an envelope pillow cover is the easiest sewing project ever for beginners. No buttons, no zippers, no piping are required. You just learnt to sew a straight line?? Congrats! you can stitch this pillow cover under 10 mins. Here is a step by step tutorial for you.

Measure and Cut your fabric pieces:

Stenciling and Sewing pillow cover tutorial. Beginner sewing project.


In above picture, I am showing how I measured and cut fabric for my 16 x 16 pillow. 

Here is what you need to do to sew one that fits your pillow:
For front:
  • Measure your pillow width and height.
  • Add half inch seam allowance to all four sides of pillow measurements, to get the front piece.
For Back:
You need 2 Pieces for the back with 2 inches overlap.
  • You are going to keep the width same as front cut piece, that is width of the pillow + half inch seam allowance to left + half inch seam allowance to right.
  • Height of these 2 pieces is going to be half inch seam allowance at the top + half of the height of the pillow + 2 inches overlap + 1 inch for double folded hem. 
Hope you got it!! Let me know if you have any questions in the comments. Once you got correct measurements and cut your fabric you are 70% done. 

Stenciling and Sewing pillow cover tutorial. Beginner sewing project.

Take one of the back fabric pieces and fold half inch along the horizontal edge that falls in the middle. Iron it. Repeat half inch fold and again iron on it. These makes it easy to sew our double folded hem.

Stenciling and Sewing pillow cover tutorial. Beginner sewing project.

Finish sewing the double folded hems on both back fabric pieces.

Stenciling and Sewing pillow cover tutorial. Beginner sewing project.

Lay the front piece with right side facing up, then one back piece with right side facing down and finally another back piece on top with right side facing down. Make sure to line up the outer edges with front piece edges.

Stenciling and Sewing pillow cover tutorial. Beginner sewing project.

Pin all four sides, while holding all the 3 pieces together.

Stenciling and Sewing pillow cover tutorial. Beginner sewing project.

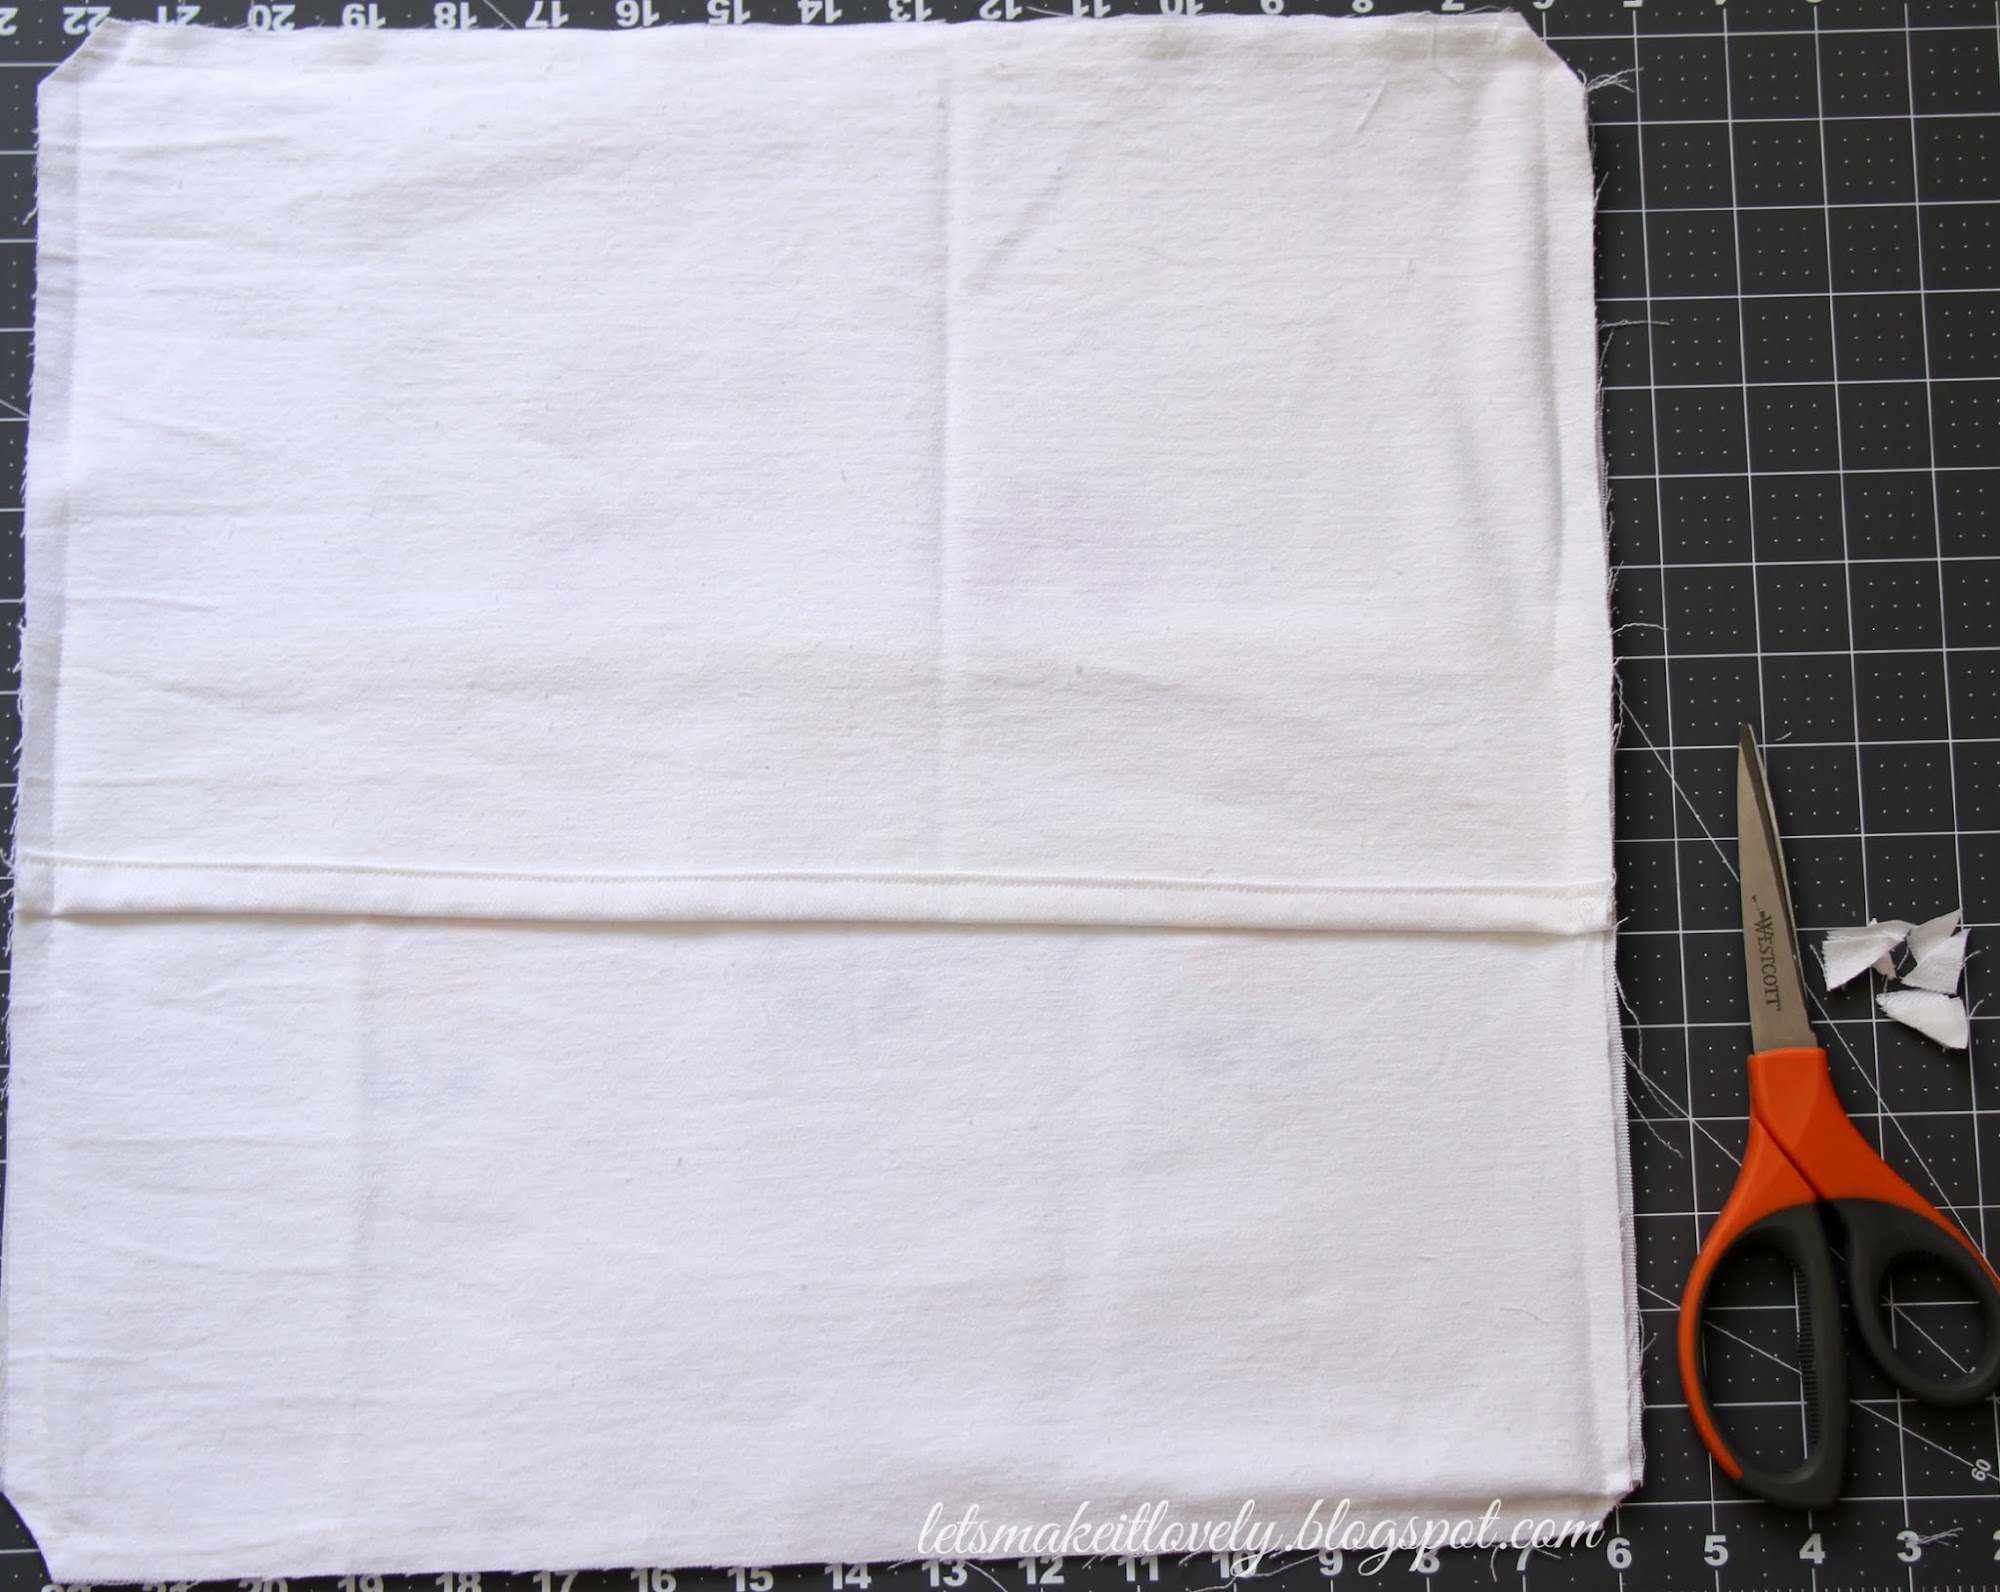
Sew all the four sides and trim the corners so that it doesn't bulk up the pillow cover corners when we turn it right side out.

Stenciling and Sewing pillow cover tutorial. Beginner sewing project.

Turn the pillow cover right side out and insert the pillow form. Tada! I told you, it's easy. Didn't I ?

Stenciling and Sewing pillow cover tutorial. Beginner sewing project. Fabric rosette Pillow.

 I made this fabric rosettes with pink fabric scrap I had, to embellish my yellow pillow. All you need is fabric pieces and hot glue gun to make these rosettes. There are so many tutorials out there in many craft blogs and youtube on how to make them.

Stenciling and Sewing pillow cover tutorial. Beginner sewing project.

Finally, a picture of all 3 pillow covers I made. I love the fact that I spent only 4$ (for fabric) on this project as I had most of the stuff already on hand. 

Let me know what you think about these pillows. I love to hear your comments. Thank you for stopping by. Have a great weekend! :)

Monday, February 16, 2015

DIY Flower girl dress or Tutu dress

Flower girl dress or Tutu dress never go out of fashion. They are so cute, adorable and make you say aaahhh pretty! I made this pretty little one as a birthday gift for a cute angel, Aditi. 


DIY No Sew Tutu Dress. DIY Flower Girl Dress. DIY Floral Tutu Dress. DIY No Sew Dress.


Isn't it just awesome that you don't need any kind of sewing equipment or sewing skills to make one like this? I know, at this point you are getting impatient and shouting just show us the procedure!!! Okay, I am coming to that.

DIY No Sew Tutu Dress. DIY Flower Girl Dress. DIY Floral Tutu Dress. DIY No Sew Dress.


Supplies you need.
  • 100 yards Tulle fabric roll. (I got mine at hobby lobby)
  • Crochet band or crochet tutu top (Lined or unlined)
  • Soft fabric flowers
  • 1.5 inch wide Ribbon
  • Glue gun
  • Rhinestones to stick on flowers (optional)
  • Scissors
Let's get started! 

DIY No Sew Tutu Dress. DIY Flower Girl Dress. DIY Floral Tutu Dress. DIY No Sew Dress.

1. Measure your girl's height from waist to toe. Double the height and that's the length of tulle strips you would need. ( Aditi's height from waist to toe is 15 inch so I cut 30 inch pieces.) I happen to have a plastic container lid that measures approx 15 inch so I wrapped my tulle around the lid and cut at a single spot to get 30 inch pieces of tulle fabric. Nice trick, isn't it?

DIY No Sew Tutu Dress. DIY Flower Girl Dress. DIY Floral Tutu Dress. DIY No Sew Dress.


2. Put the crochet band around a cubical or cylindrical box such that your band stretches a tiny little bit and makes finding the crochet holes easier.


DIY No Sew Tutu Dress. DIY Flower Girl Dress. DIY Floral Tutu Dress. DIY No Sew Dress.

3. Now take a cut piece of tulle, fold into half and insert in one of the holes on 3rd row from down of the band. Make a loop and pull through the rest of the tulle piece such that it knots on itself to the band. 
Proceed doing same all around the crochet band in same row and leaving alternate holes.

DIY No Sew Tutu Dress. DIY Flower Girl Dress. DIY Floral Tutu Dress. DIY No Sew Dress.

4. It should look like above picture, once you finish the first row. If you look closely, you can see little gaps between every two knots. Don't worry about those, we are going to cover them with next layer of tulle.


DIY No Sew Tutu Dress. DIY Flower Girl Dress. DIY Floral Tutu Dress. DIY No Sew Dress.

5. For the second layer, choose third row from the earlier worked row on crochet band. Repeat to knot tulle pieces around the chosen row. Try to knot the tulle pieces in between tulle pieces of earlier worked row so that you cover those gaps between earlier tulle pieces. 

DIY No Sew Tutu Dress. DIY Flower Girl Dress. DIY Floral Tutu Dress. DIY No Sew Dress.

5. After you are done knotting tulle pieces around the second layer, your dress should look like above.

DIY No Sew Tutu Dress. DIY Flower Girl Dress. DIY Floral Tutu Dress. DIY No Sew Dress.

6. For the sleeves: Bring the satin ribbon through 3rd or 4th hole from the right side in the 2nd row from top of crochet band knot it to crochet band. Bring it under the crochet band to left side and knot it again at 3rd or 4th hole from left on the same row. Make sure you have enough ribbon to tie a bow at the back of dress.

DIY No Sew Tutu Dress. DIY Flower Girl Dress. DIY Floral Tutu Dress. DIY No Sew Dress.


7. Bring both ribbon ends to the back and slide them through corresponding holes from the front side. Do not knot the ribbon here, just bring the ribbon down under the band and get the ribbon out at which ever height you like to tie a bow. This makes the straps adjustable and doesn't let the sleeves to slide off the baby shoulder easily.

DIY No Sew Tutu Dress. DIY Flower Girl Dress. DIY Floral Tutu Dress. DIY No Sew Dress.


8. Tie a pretty bow and cut v shape at ribbon ends. 


DIY No Sew Tutu Dress. DIY Flower Girl Dress. DIY Floral Tutu Dress. DIY No Sew Dress.

9. Using your hot glue gun start sticking fabric flowers on to crochet band row by row. Always be careful while using hot glue gun.

DIY No Sew Tutu Dress. DIY Flower Girl Dress. DIY Floral Tutu Dress. DIY No Sew Dress.

10. You can get creative and stick flowers in random fashion or form a heart or do it diagonal. I decided to fill entire arena with flowers.

DIY No Sew Tutu Dress. DIY Flower Girl Dress. DIY Floral Tutu Dress. DIY No Sew Dress.

11. If you are doing the same design like mine, make sure to go back and fill the little gaps in between flowers. 

DIY No Sew Tutu Dress. DIY Flower Girl Dress. DIY Floral Tutu Dress. DIY No Sew Dress.


That's it!!!  Now, go do a happy dance. Just make sure to close windows in case you do crazy dancing like me :)
Aaaahhhh isn't it pretty??? I wish I could fit into this little dress. LOL :)

Don't forget to make matching hair clips. Stick same flowers on plain hair clips to match the dress. Oops!!! I forgot to take a picture of the clips I made. Will update you with a picture, when I visit the little girl next time.

I hope this tutorial helped you. Thank you so much for joining me in making this pretty floral dress or tutu dress. I love to hear your comments. Thank you for stopping by.

P.S: Make sure you like my Facebook page Let's Make it Lovely to stay connected.
Have a good day :)