Tabs

home aboutme homedecor recycle sew organize gallery

Tuesday, May 26, 2020

Mango Birds Fruit Art


Hi friends, I am back with another beautiful fruit art using just a knife. One evening when I asked my daughter what fruit art should we make with mangoes, she said let's make birds mommy. And she added that yellow birds will look cute. Well, I think they definitely turned out cute.

Mango Birds, Fruit art, Healthy food for kids, Healthy food for toddlers

To make this fruit art you need a few strawberries, one mango, and edible googly eyes. Then I added a couple of apple slices and few blueberries to get enough fruits on her plate. You can substitute with whatever fruits are available in your kitchen that you think might suit the design.

Mango Birds, Fruit art, Healthy food for kids, Healthy food for toddlers

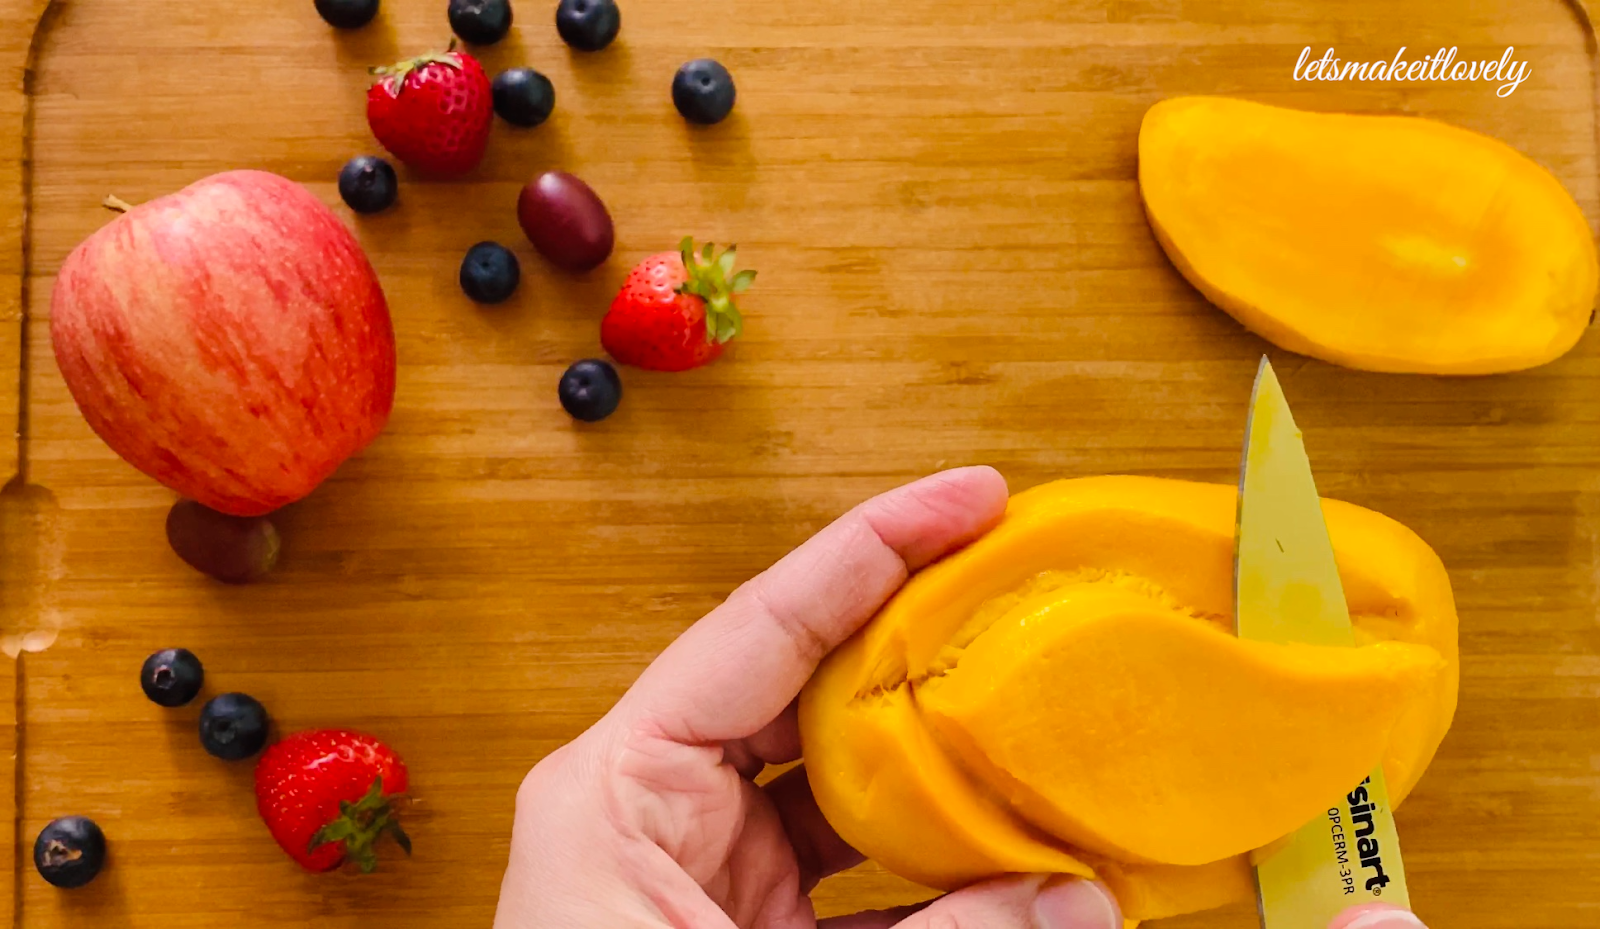
First I sliced a big chunk of mango going right next to the seed and then using the tip of my knife I traced a bird shape. After making sure I like the shape I went around again going a little bit deeper.
Mango Birds, Fruit art, Healthy food for kids, Healthy food for toddlers

Then I pushed the bird shape inside out and sliced under the bird all the way. Check out the video at the bottom of the post for any clarifications.

Mango Birds, Fruit art, Healthy food for kids, Healthy food for toddlers

For strawberry hearts, first I cut each strawberry vertically half. Then from the top, I cut out a small 'V' shape and curved around the edges. I used these strawberry hearts for bird's wings and to add some love on the top.

Mango Birds, Fruit art, Healthy food for kids, Healthy food for toddlers

Slice two thin pieces of apple to form a ground (on which birds are standing). And I added a line of blueberries that look like rocks in our art.

Mango Birds, Fruit art, Healthy food for kids, Healthy food for toddlers

I also cut 2 small triangles out of grapes for bird's beaks and 4 tiny rectangles for legs. If you don't have edible googly eyes on hand then you can always cut 2 small circles out of blueberries for eyes.

Mango Birds, Fruit art, Healthy food for kids, Healthy food for toddlers

Here is the final design. What do you think? Did it turn out cute? Let me know in the comments. Thank you for stopping by.


Don't forget to check out this video on youtube for a clear understanding. And be sure to subscribe to my channel. Thank you once again. See you soon.

Sunday, May 17, 2020

Kids Craft: Rainbow Hearts Banner

Hearts Banner, is a perfect project to do during the quarantine. We all would have some cardboards lying around at home. Creating something from nothing brings great joy to little ones. And in the end, kids will have their own masterpiece to decorate their room with.

Kids craft, Cardboard craft, Heart banner, DIY Kids room Decor, Easy crafts for kids

I and my 3-year-old enjoyed making this together. We painted it my little one's favorite rainbow colors. She is obsessed with anything rainbows, unicorns, or animals. We hope you will enjoy making it too.

Kids craft, Cardboard craft, Heart banner, DIY Kids room Decor, Easy crafts for kids

You need cardboard,  scissors, and a heart template to start with. Here I am using a heart cardstock cut out from a valentine banner that I made long ago. You can draw a heart and cut it out or print a heart shape and cut it to use as a template. Having a template on hand makes it easy to get all of them in the right size.

Kids craft, Cardboard craft, Heart banner, DIY Kids room Decor, Easy crafts for kids

Using a pencil trace around your heart template on cardboard. You can trace as many hearts as you like. We did 7, each one for each color of the rainbow.

Kids craft, Cardboard craft, Heart banner, DIY Kids room Decor, Easy crafts for kids

Then I cut the hearts out using scissors. If you are letting your kid handle the scissors, then use your own judgment. My 3-year-old is too young to cut cardboard, so I did that for her. 

Kids craft, Cardboard craft, Heart banner, DIY Kids room Decor, Easy crafts for kids

She had so much fun coloring the hearts. We used acrylic colors. Best Tip: Use a cheap cookie tray for painting little things with little ones. It always helps keep the mess contained. I got my cookie tray long ago at Walmart for 80c. It was well worth it. 

Kids craft, Cardboard craft, Heart banner, DIY Kids room Decor, Easy crafts for kids

After the paint dried, I coated them with clear varnish to give them a nice finish. And let dry again.

Kids craft, Cardboard craft, Heart banner, DIY Kids room Decor, Easy crafts for kids

Stick the hearts to a thread using tape. And tada! hearts banner is ready to add color to your walls.

Kids craft, Cardboard craft, Heart banner, DIY Kids room Decor, Easy crafts for kids

My little one put it above her play kitchen. I think it looks so cute. What do you think? Let me know in the comments. I would love to hear from you. Thank you for stopping by.

Monday, May 11, 2020

Simple Fruit Art

Hello, if you have been following me on social media you know how much I am into fruit art these days. It all started when my little one suddenly lost interest in eating fruits. I couldn’t give up and kept running behind her to get a cup of fruits into her tummy. It was most frustrating for both of us. Suddenly one day I got reminded that I had a few fruit skewers left out from her birthday party and I decided to give them a shot. I cut a few different colored fruits and put them on a skewer. I went to her sneaking it behind and said surprise here is a fruit wand for my princess. Thank god it worked and she got so excited to eat fruits that day. That’s the beginning and I never stopped after that. Making simple yet beautiful art on the plate was fun for me and it was fun for my little one to eat. It was a win-win.

Fruit art, Food art, Food art for kids, Kids Snack Ideas, Healthy food for Kids

As I started sharing them on social media few of my friends reached out to me and asked to make short videos to show them how I make those food art plates. So here I am sharing my first fruit art video with you all. This one doesn't need any kind of special tool, just your regular kitchen knife will do the trick. I am going to show more fruit art and breakfast art ideas. Subscribe on youtube to be notified when I post them.


 I share my food art pictures on Instagram. If you want to see some stunning yet simple fruit art I highly recommend following me at letsmakeitlovely.

Hope you enjoyed my first food art video. Do tell me in the comments if you will give it a try. Thank you so much for stopping by. See you soon.

Monday, May 4, 2020

Kids Craft: DIY Bird House

DIY Bird House, Kids Crafts, Summer activities for kids, Kids DIY, Kids DIY Bird House

We live in Florida and the weather here has been beautiful for past 2 months. My daughter and I spend most of our quarantine in our patio. Our mornings are filled with sweet birdie tweets and melodies. Last week I decided to make a bird house and we up-cycled our empty milk mug into this cute little bird house. 

DIY Bird House, Kids Crafts, Summer activities for kids, Kids DIY, Kids DIY Bird House

You need scissors, an empty milk jug and some duct tape to make this bird house. We used some acrylic colors and stencils that we had on hand to decorate it but this step is totally optional.


DIY Bird House, Kids Crafts, Summer activities for kids, Kids DIY, Kids DIY Bird House

I used my duct tape to trace 2 circles on the milk mug and cut them out with scissors. Use your judgement if you are going to let your little one handle the scissors.

DIY Bird House, Kids Crafts, Summer activities for kids, Kids DIY, Kids DIY Bird House

Then we both covered the cut circles with pieces of duct tape as shown in the picture, just to protect the birds from any sharp edges.

DIY Bird House, Kids Crafts, Summer activities for kids, Kids DIY, Kids DIY Bird House

Decorating our bird house was so much fun. My little one loved having the freedom to pick colors of her choice and sponging the paints all by herself. She was super excited to remove the stencil and see how beautiful the flowers turned out.

DIY Bird House, Kids Crafts, Summer activities for kids, Kids DIY, Kids DIY Bird House

After the acrylic colors dried out I took out my clear spray can that I had left over from years ago and sprayed it lightly on our design to protect it from rain. I closed the bird holes with the cut out circles and tape as shown in the picture as not to get any spray inside the bird house.

DIY Bird House, Kids Crafts, Summer activities for kids, Kids DIY, Kids DIY Bird House

We used couple of bamboo skewers from our kitchen and made little platform for birds entrance as shown in the picture above. After getting the skewers in right position I cut off the sharp pointed ends a little so that it will be completely safe for the birds. You can instead use the popsicle sticks if you have.

DIY Bird House, Kids Crafts, Summer activities for kids, Kids DIY, Kids DIY Bird House

I used an Xacto knife to make small slit on the top of the jug next to the cap and put a bird feeder chain through as shown in the picture. Then we hung it on a tree next to our patio using a S hook.

DIY Bird House, Kids Crafts, Summer activities for kids, Kids DIY, Kids DIY Bird House

We filled the bird house with wild bird food and we desperately waited for it’s visitors. The birds took couple of days to visit our bird house. Few sparrows and cardinals enjoyed the feed but soon squirrels invaded it. Nonetheless my little one enjoys squirrel watching too so it was still a win for us. 

Hope you enjoy making a bird house with your little one as much as I did. Let me know what you think about our bird house in the comments. I would love to hear from you. Thank you for stopping by. 

Thursday, April 23, 2020

Little Projects for my Little One Part-3

Hello all, Hope you are all doing good. I missed blogging so much in the past few years. I had to take a break to shorten my to do list and keep myself sane for a bit. But it turned out keeping myself busy is what keeps me sane. Isn't that funny? Let me continue from where I stopped. I was sharing the little projects that I put together before my baby arrived and this part 3.

DIY little girl's Jewelry Chest, Baby Photo Frames, Pink heart Pillow cover, Floral Basket, Baby Nursery Projects, Nursery Crafts

How cute is this little jewelry chest? I saw a similar one in Etsy listing but they were all sold out. Later when I saw this empty wooden chest at Michaels I had to grab it. I painted it in white and shades of pink Ombre style. Decorated the top 2 drawers with flowers and second row with simple polka-dots using nail art dotting tools. The third row I wanted to paint tiny hearts so I used my cricut to cut out a customized stencil to get a perfect finish.

DIY little girl's Jewelry Chest, Baby Photo Frames, Pink heart Pillow cover, Floral Basket, Baby Nursery Projects, Nursery Crafts

The picture above gives you a glimpse of how I painted it.

DIY little girl's Jewelry Chest, Baby Photo Frames, Pink heart Pillow cover, Floral Basket, Baby Nursery Projects, Nursery Crafts

I love hearts and I had this heart shaped pillow that I got from my husband as a gift. But it's bright red looked out of place and I wanted to cover it in pink to go with my theme. I got this pink rosette textured fabric from etsy and sew this simple pillow cover similar to my patio pillows except this one is cut in heart shape and I just added a Velcro piece for closure.


DIY little girl's Jewelry Chest, Baby Photo Frames, Pink heart Pillow cover, Floral Basket, Baby Nursery Projects, Nursery Crafts

It was a quick project and I heart how it turned out.

DIY little girl's Jewelry Chest, Baby Photo Frames, Pink heart Pillow cover, Floral Basket, Baby Nursery Projects, Nursery Crafts

I saved little scrap wood pieces from DIY Coat rack project and this scrap wood photo frame was a simple project to put them to use.
DIY little girl's Jewelry Chest, Baby Photo Frames, Pink heart Pillow cover, Floral Basket, Baby Nursery Projects, Nursery Crafts

I covered the wood pieces with scrapbook papers using modpodge and added wood dowel pieces to the back to make them stand. For the pink one I just mounted the picture using double side foam tape. For the grey color one I decided to add those little clips to make it extra cute. And I had grabbed that oval shaped frame from Michaels Dollar bin long ago. I just spray painted that one white.

DIY little girl's Jewelry Chest, Baby Photo Frames, Pink heart Pillow cover, Floral Basket, Baby Nursery Projects, Nursery Crafts

I found this cute basket at Target for 3$ and thought it would be perfect to fill it with diapers next to the changing station. 

DIY little girl's Jewelry Chest, Baby Photo Frames, Pink heart Pillow cover, Floral Basket, Baby Nursery Projects, Nursery Crafts

I made these easy felt flowers and stuck them to basket using hot glue. You can refer my easy gift bag tutorial if you want to see how these flowers are made. I love how girly the basket looks now.

Hope you enjoyed reading this post. Let me know what you think about these simple projects. Would love to hear your comments. Thank you for stopping by.

Saturday, April 21, 2018

Little Cricut Projects for my Little one Part-2

Handmade products are the best and when they are made for your tiny bundle of joy they become even more precious. Here is the second set of crafts that I did for my little one.


I always dreamed of having a little girl, so of course I had to make a banner for our maternity photo shoot to shout out my joy and here is that. I made this onesie banner with the help of my Cricut cutting machine. It saves me whole lot of time now that I have other things to take care of.


I just designed my project in Cricut software and put the pieces together once they are cut. It took a little bit of time until I got hang of the machine and now I just love it.


I saw these cute onesie designs on a shopping site but I wanted to give my Cricut a shot, so I designed stencils and used Martha's multipurpose acrylic paints that I already had on hand.


They turned out really cute. Did you ever go shopping clothes for a little girl? Most of the time they have quotes only about dad's like Dad's little princess etc., so I just loved this quote "I'm Cute. Mom's Cute. Dad's Lucky"and I just had to recreate it.


This was my first Iron on project and it was Super easy to do. I chose the word #adorable for this little baby pink onesie.


My Cricut cut through the gold glitter iron on like it was butter. All I had to do was follow the instructions that came with my iron on sheet and after that little bit of ironing it was all done. I used Cricut Iron on sheet and it stayed so well even after multiple washes.


I wanted a 3 piece wall art to go above my baby crib. I saw these wooden boards at Michaels and started brainstorming.


I decided the 3 quotes I wanted on them and whipped up these cute designs on Cricut with card stock and scrapbook papers I had on hand. Personally I think this wall art didn't turn out exactly like how I imagined but I still love it. What do you think?

Would love to hear your comments. Thank you for stopping by.

Wednesday, March 21, 2018

Little Projects for my Little one - Part 1

I am very excited writing this post as I am finally going to show you few of my teeny projects I did for my little one. You can be sure there is more coming, I can't wait to get to her first birthday post yet. I didn't give up crafting at all, its just hard to make time for blogging these days. I hope I will find a way soon.

Baby Booties. Pink Crochet Shoes. Floral baby shoes.

Here comes the most adorable project, Crochet Shoes. Actually this was the last project I did in my 9th month of pregnancy waiting for my little angel to step out. I was literally impatient counting days to see my princess. But I wanted to share this project first because, come on whats more cuter than handmade pink shoes of newborn. I followed multiple tutorials from YouTube to make these.


Handmade Burp Rags. Soft Burp rags. Sew Burp Rags.

I and my mom sew up these burp rags and hand towels just because we love handmade projects. They are super cute and super soft. I used nursery fannel fabric from Joann. God I was lost looking at all the pretty fabrics they have for little ones.

Handmade Burp Rags. Soft Burp rags. Sew Burp Rags.

I followed the tutorial and template from My Happy Nursery for the burp rags. If you don't know what burp rags are they are soft clothes that go over mother or any care taker's shoulder and catch spit up from baby's burps while carrying them.


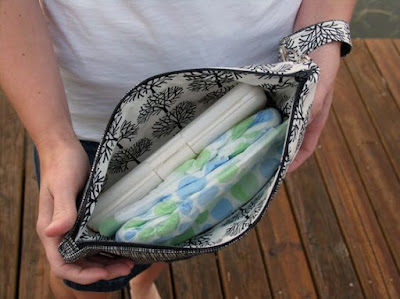
Baby Essential on the go. Sew Diaper Clutch. Handmade Diaper Clutch with zipper. Internal Zipper Pocket.

This was a fun one day project for me. I sew this exactly like how I sew my make up pouch except I increased the measurements so that it can hold 2 diapers, small wipes case. I also added an internal zipper pocket for Desitin or any other small essentials and a wristlet to keep my hands free. This clutch came very handy many times especially in flight journeys.

Baby Essential on the go. Sew Diaper Clutch. Handmade Diaper Clutch with zipper. Internal Zipper Pocket.

If you are looking for a internal zipper tutorial here is a good one to follow.

Baby Essential on the go. Sew Diaper Clutch. Handmade Diaper Clutch with zipper. Internal Zipper Pocket.

This etsy listing was the one that inspired my diaper clutch.


Organize Cards. Card Wallet. Sew Card Wallet.

Though its not exactly baby related, Card Wallet was another fun project I did when I was pregnant to keep my bag little more organized before baby arrival. This one took little more time than I thought to get all the measurement markings and calculations correct. 

Organize Cards. Card Wallet. Sew Card Wallet.

I took a whole lot of pictures of making this card wallet so that I can write a tutorial but I guess it will take me forever to write tutorials now with all the work piled up. So here is another wonderful tutorial from Infarrantly Creative if you want to make one.

There are a lot more little projects I did that I want to share a glimpse of. Will try to post again soon. I am really trying hard to keep myself motivated to continue blogging. Share your views and comments to keep me on track. I really love to read them. Thank you for stopping by.

Wednesday, October 25, 2017

DIY Baby Strawberry Costume

Can't believe its my little one's second Halloween already. Last October I was surfing internet to find a comfortable strawberry costume for my then 6 months old and was highly disappointed to see that all of the store bought costumes are thick and bulgy for a little baby. So I decided to make one at home. This costume from amazon was my inspiration. I loved how cute my homemade strawberry costume turned out.

DIY Baby Strawberry Costume, DIY Simple Halloween Costume for Infant, Easy Handmade Costume


I started with a red onesie that I bought on amazon and felt squares of different colors that I had in my craft supplies.

DIY Baby Strawberry Costume, DIY Simple Halloween Costume for Infant, Easy Handmade Costume


I drew a simple seed design on little cardboard piece and cut it out with a pair of scissors. Using that cardboard seed as template I cut a lot of seeds out of black felt piece and stuck them in polka dot pattern on onesie using hot glue gun. You can use fabric glue if you have or if you prefer to wash your costume. I didn't have time to go out and shop so I went ahead with what I had on hand.

DIY Baby Strawberry Costume, DIY Simple Halloween Costume for Infant, Easy Handmade Costume


Similarly I made a leaf cardboard template and cut leaves out of two shades of green felt pieces that I had on hand. I was satisfied with how dark green looked so I went ahead and stuck it under neck ruffle of the onesie.

DIY Baby Strawberry Costume, DIY Simple Halloween Costume for Infant, Easy Handmade Costume


I just added a small white flower (from my craft stash) in between leaves to add little more detail.

DIY Baby Strawberry Costume, DIY Simple Halloween Costume for Infant, Easy Handmade Costume

I just loved how cute and adorable my baby looked in this strawberry costume. Ofcourse the fact that its handmade by me added to my happiness. Thanks for stopping by. Have a Happy Halloween.