Tabs

home aboutme homedecor recycle sew organize gallery
Showing posts with label Totebag. Show all posts

Wednesday, August 27, 2014

DIY Round Corded Bag Handles the Easiest Way Ever

       
DIY Round Corded Bag Handles the Easiest Way Ever


When I started making my Faux Leather Base Tote Bag, I wanted to make it as close to the store bought bags as possible. I felt like I can really do it, until I reached the final part "Adding Handles". I really had no idea how to make round handles, except that I need to use some kind of stuffing to make them round.

When I searched Pinterest for Making Round Corded handles, I found these two awesome tutorials, Rolled Handbag Handles and Making Faux-Leather Handles. Unlike me, if you have good sewing skills, these tutorials will work beautifully for you. After few trials, I understood its not an easy job for a beginner like me to sew a perfect looking handles. But these tutorials gave me enough inspiration that I didn't want to give up so easily. 
         
The thoughts of making corded handles kept rolling in my mind and then I finally discovered an easy way. Do you know how to re-string a drawstring pants? Hurrah!!! You got this then :) Are you wondering how? Let's get started then.

DIY Round Corded Bag Handles the Easiest Way Ever

 Supplies needed:
  • 2 Vinyl (Faux Leather) Pieces of 27x3.4 inches
  • Sew witchery (optional)
  • 0.5 inch thickness filling cord
  • Walking Pressure foot for your machine (Teflon Foot might work too)
  • Sewing Notions (I used 100% Polyester Thread and 100/16 Needle as we got to sew through vinyl.)
  • A wooden dowel of 0.47cm thickness (I had few left over from my DIY Star Burst Mirror Project)
  • Strong and thin Jute Twine rope of 32 inches. ( Go for a strong twine. I failed several times using light to medium strength threads.)
The idea is to first sew flat handles and then insert the cording through your handles.

DIY Round Corded Bag Handles the Easiest Way Ever

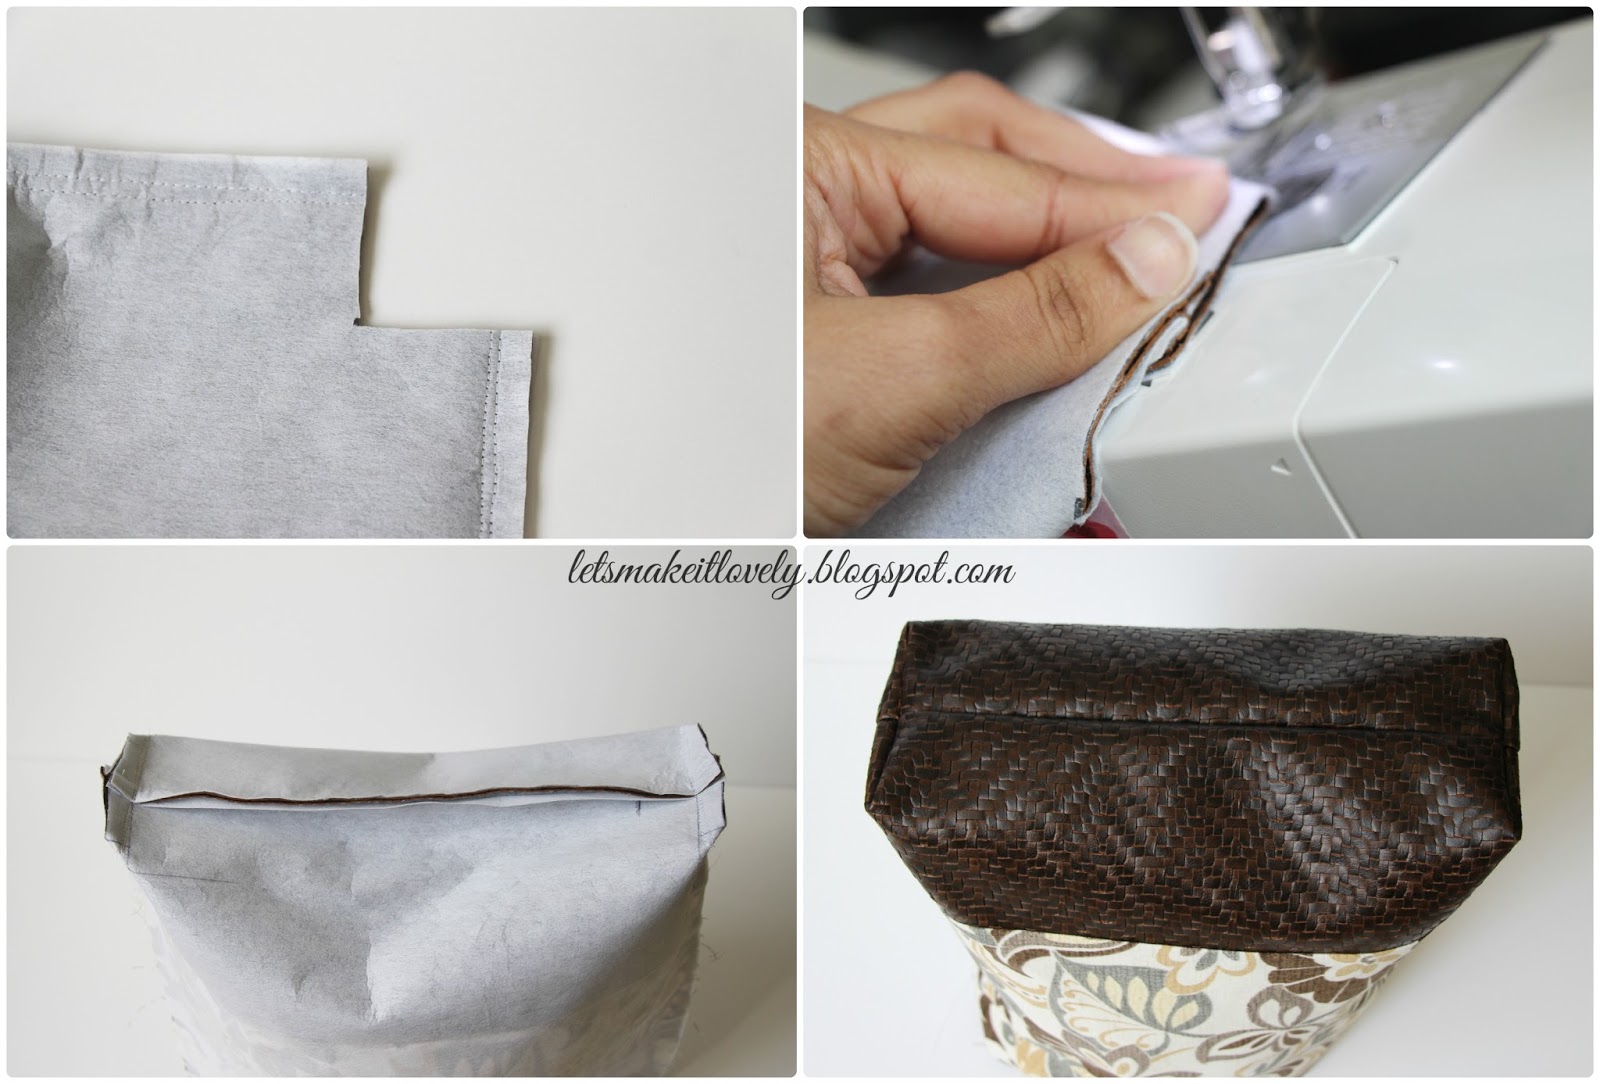
1. Fold about 1/2 inch inside on both long sides of 27x3.4inches vinyl pieces and press with iron. I used 1/4 inch Stitch witchery to help hold the vinyl layers together. (Always use a press cloth on vinyl before ironing.)


 An easy way to determine how much width will work best for your cord is just to fold the long edges in, place cord in middle and wrap around. Don't forget to include seam allowance before you measure.


DIY Round Corded Bag Handles the Easiest Way Ever

 2. Again fold the vinyl piece into half, use binder clips (do not use sew pins as they can leave holes in Vinyl) to hold together and sew close with 1/8th inch seam allowance. This is where my walking pressure foot helped me get a good stitch on layers of vinyl.  Leave 2 inches on each end of the handles open.

DIY Round Corded Bag Handles the Easiest Way Ever

3. Now, lets get our magic wand ready!!! Take the twine and join it to one end of filling cord. ( I used a big fat needle I had on hand to get twine through filling cord and then secured it with a knot.)

4. Tie the other end of  twine to one end of wooden dowel and secure with duck tape.

DIY Round Corded Bag Handles the Easiest Way Ever

 5. Insert the free end of wooden dowel (the end which is not attached to twine) through the middle of our vinyl flat handle. Pull the wooden dowel out, this will drag the twine into handle and then the cord.

DIY Round Corded Bag Handles the Easiest Way Ever

6. Once the cord gets in place, cut the twine from cord.

DIY Round Corded Bag Handles the Easiest Way Ever

7. Sew close the 2 inch open edges on either sides of handles.
That is it!!! The magic is done :)


If you are here following my Faux Leather Base Tote Bag tutorial, then measure and mark where you want to position your handles on the bag. Sew the handles in marked positions and Tada!!! You are done.

Now show off your bag to your friends, family and ofcourse to me :)

Isn't making perfect corded handles easy this way? Now you can get creative and make colorful handles to coordinate with your bag colors. Enjoy!

I hope this tutorial was helpful for you. I was very excited when this trick worked for me, after almost an hour of trials. Thanks for stopping by :) Love to hear your comments.


Sunday, August 24, 2014

Adding Hard Base, Bag feet and Magnetic Closure to a Bag

Adding Hard Base, Bag feet and Magnetic Closure To a Bag

  
Inserting Bag feet:

Adding Hard Base, Bag feet and Magnetic Closure To a Bag

1. Make a small slit in the bag base where you want to insert bag feet. Get the bag feet prongs together and insert through slit.
2. Create small gap between bag feet prongs.
3. Insert washer, through the prongs.
4. Press prongs on to the washer to lock the bag feet in place.


Hard Base and Bag feet:


1. There are 2 options here, either to use corrugated plastic cardboard sheet or a normal paper based cardboard. Measure the base of your bag and cut your cardboard sheet.

My Faux Leather base Tote Bag has a base of 11x4 inches. I upcycled a carton box I had at home for the hard base. (Since the carton is not strong enough i took 2 pieces of 11x4 size of the carton, layered them and stuck them together with duck tape all around.)


Adding Hard Base, Bag feet and Magnetic Closure To a Bag

2. Through the opening in your bag lining, place the cardboard piece in between bag exterior and lining.

Adding Hard Base, Bag feet and Magnetic Closure To a Bag


3. Secure the cardboard in place with binder clips.
4. Mark the 4 spots on your base where you want your bag feet to go. Its better to place them atleast 1 inch inside from bag base corners.


Adding Hard Base, Bag feet and Magnetic Closure To a Bag

5. Using your seam ripper or sharp craft knife, make small slits on the marked places through both exterior fabric and cardboard piece. Be very careful not to slit too much. You just need a slit size little less than your bag feet prongs.

Adding Hard Base, Bag feet and Magnetic Closure To a Bag


6. Now add your bag feet and secure cardboard in place.

Adding Magnetic Closure:

Adding Hard Base, Bag feet and Magnetic Closure To a Bag

  
1. Separate your magnetic snaps from washers.
2. Place the magnetic snap where you want it on the bag and mark the prongs positions.
3. Make a small slit (about little less than prongs width) with sharp craft knife or seam ripper.
4. Insert the magnetic snap prongs into the slits made.
5. On backside, add the washer through Prongs.
6. Press the prongs towards each other to secure the snap in place. (Usually you need something hard to press these prongs. I used my metal ruler I had on hand.)

Adding Hard Base, Bag feet and Magnetic Closure To a Bag

 If you are following my Faux Leather base Tote bag tutorial, then you need to insert the magnetic snaps to the fusible fleece we added at the top of our lining pieces. (Use the opening left in lining to reach there.)

Adding Hard Base, Bag feet and Magnetic Closure To a Bag

Now bring the lining outside and close the opening.

Adding Hard Base, Bag feet and Magnetic Closure To a Bag

Isn't it cool? Simple additions can get our handmade bags to next level ;)

In my next post I will share with you an easiest way ever to make faux leather corded hand bag handles.

Do you like sewing? Have you ever tried making a tote bag? If yes, I would love to see them. Leave a picture or link in your comments. Thank you for stopping by :) 

Wednesday, August 20, 2014

Faux Leather Base Tote Bag


Hello my lovely friends, today lets climb one more step on sewing ladder and make a Tote bag with faux leather base. Are you as excited as I am? Then, lets do it!!! This post looks too lengthy because of explanation, but trust me its super simple to sew it.


Faux Leather Base Tote Bag Step by step Tutorial Part-I (Includes measurements)

Supplies needed:
  • Vinyl of your choice (Faux Leather)
  • Printed fabric for bag exterior ( I recommend the home decor fabric as it is little sturdier than usual cotton prints)
  • Sewing and fabric cutting supplies(I used 100% Polyster Thread and 100/16 Needle as we got to sew through vinyl.)
  • Light weight firm iron on backing ( I used pellon 809 decor bond.)
Faux Leather Base Tote Bag Step by step Tutorial Part-I (Includes measurements)


Measurements for cutting fabrics:

For Bag Exterior:
  • 2 Vinyl Base Pieces of 6x16 inches
  • 2 Exterior Fabric Pieces of 10x16 inches
  • 2 Light weight iron on backing of 15x16 inches
 For Bag Interior:
  • 2 Exterior fabric pieces of 3x16 inches
  • 2 light weight iron on backing pieces of 2x3 inches (you could also use fusible fleece scrap pieces instead of iron on backing in this step)
  • 2 lining fabric pieces of 13x16 inches
  • 4 lining fabric pieces of 6.5x10.5 inches

Sewing Exterior of Bag :

Faux Leather Base Tote Bag Step by step Tutorial Part-I (Includes measurements)

1. With 1/2 inch seam allowance join your 10x16 inch exterior fabric with 6x16 inch vinyl. Repeat with other set of exterior fabric and vinyl pieces too.

Faux Leather Base Tote Bag Step by step Tutorial Part-I (Includes measurements)

2. Press the seams with iron and fuse the firm iron on backing to the wrong side of the above constructed exterior pieces. (Always use a press cloth over vinyl before ironing.)

Faux Leather Base Tote Bag Step by step Tutorial Part-I (Includes measurements)

3. Join the bag exterior pieces with right sides together and sew three sides with 1/2 inch seam allowance ( leave the fourth side which is the top open for your bag.)

Faux Leather Base Tote Bag Step by step Tutorial Part-I (Includes measurements)


4. Cut out 2x2 inch squares from bottom corners of bag (vinyl corners) and fold the corners such that side and bottom bag seams match in line and sew close the opening with 1/2 inch allowance as shown in picture . ( This step is nothing but boxing out your bag bottom.) Now our bag exterior shape is almost done.

Making pockets to add to the lining:


Faux Leather Base Tote Bag Step by step Tutorial Part-I (Includes measurements)
5. Take a pair of 6.5x10.5 inch lining fabric pieces and sew all four sides with 1/4th inch seam allowance leaving a 3 inch gap on one side to turn it inside out.
6.Turn the piece inside out through the gap left and finish the open side with top stitch.
7. Repeat steps 5 and 6 with other pair of 6.5x10.5 lining fabric pieces. ( Sorry, I forgot to take a pic after finishing top stitch. But you would basically have 2 well finished rectangle fabric pieces. )


Sewing Interior of Bag:


Faux Leather Base Tote Bag Step by step Tutorial Part-I (Includes measurements)


8. Add 2x3 inch iron on backing or fusible fleece interface to the middle of  3x16  inch exterior fabric pieces. This backing is to provide little sturdiness to our magnetic snaps which we will add later. ( I forgot to add it in this step but i managed to add it just before adding my magnetic snaps. So do not get confused if you don't see this backing piece in further pictures.)
9. Join the above constructed 3x16 inches exterior fabric piece with 13x16 inches lining fabric piece.
10. Repeat the steps 8 and 9 with the other set of 3x 16 inch exterior fabric, 2x3 inch iron on and 13x16 inches lining fabric pieces.

Faux Leather Base Tote Bag Step by step Tutorial Part-I (Includes measurements)

11. To add pockets to bag lining, pin one of the rectangle fabric pieces (we constructed it in making pockets step) to one side of bag lining piece and stitch all the sides except the side facing the 2 inch exterior fabric piece. Sew intermediate lines for pocket divisions.

12. Repeat steps 11 with another rectangle (we made in making pocket step) on the other side of bag lining.


Faux Leather Base Tote Bag Step by step Tutorial Part-I (Includes measurements)


13. Sew the finished lining pieces right sides together with 1/2 inch seam allowance leaving the top side open and also leave 5inch opening on bottom side. ( Leaving opening on bottom is important to turn the bag right side out later.)

14. Box out the corners like we did in step 4 for bag exterior.

Joining Exterior of bag with Interior lining:


Faux Leather Base Tote Bag Step by step Tutorial Part-I (Includes measurements)


15. Take the exterior bag piece with right side out and lining piece wrong side out. Insert exterior piece completely inside lining piece.

Faux Leather Base Tote Bag Step by step Tutorial Part-I (Includes measurements)


16. Pin the top openings of lining and exterior pieces together all around. Sew along the pinned line.

Faux Leather Base Tote Bag Step by step Tutorial Part-I (Includes measurements)


17. Using the bottom opening in lining (opening we left in step 13) , pull the exterior piece out and turn lining right side out.

Faux Leather Base Tote Bag Step by step Tutorial Part-I (Includes measurements)


18. Push the lining fabric inside and press along the top seam of the bag we just made. Take your time and press this seam with iron as it is important for how your bag looks later.

Faux Leather Base Tote Bag Step by step Tutorial Part-I (Includes measurements)


19. Top stitch all around the top edges of the bag with 1/8th inch seam allowance.


Faux Leather Base Tote Bag Step by step Tutorial Part-I (Includes measurements)

Finally our tote bag took a shape. Take a little break and admire your work. 
Learn to add Sturdy cardboard base, bag hardware like bag feet, magnetic snap closure and handles in my next post. Here is a sneak peek for you.


Hope you could make it so far in this bag making. As always I love to read your comments. Thank you for stopping by.